Most proxy tutorials assume a browser or a Python script. The terminal is different: there is no settings panel, so you configure everything with environment variables, flags, and a few config files. This guide covers every method, the tools that use them, and how to point them at a Proxy-Cheap gateway.
Proxy integration with the terminal means routing the network traffic of command-line programs through a proxy server instead of sending it straight from your machine. The proxy receives each request, forwards it to the target site through its own IP, and returns the response to your shell.
There are two mechanisms, and most workflows use both:
The terminal approach is precise. You can proxy a single command and leave everything else direct, and on most systems you do not need administrator rights to set a shell variable. That makes it the default choice for automation scripts, CI jobs, remote servers, and headless machines that have no graphical settings at all.
A direct connection from one IP is fine for a handful of requests. It stops being enough as soon as you script real volume, pull data from several regions, or run jobs from a shared server. Most production command-line work runs through a rotating residential proxy network for three reasons.
If you are new to proxy credentials and dashboards, the step-by-step guide to using residential proxies is a good companion to this article. The rest of this guide assumes you have a proxy host, port, username, and password ready.
Three protocols cover almost all terminal use:
For a deeper comparison of when each fits, see SOCKS5 and HTTP proxies compared. The four environment variables map onto these protocols:
| Variable | Applies to | Notes |
|---|---|---|
| http_proxy | Requests to http:// targets | curl accepts the lowercase form only |
| https_proxy | Requests to https:// targets | Most real traffic is HTTPS, so set this too |
| all_proxy | Every protocol, as a fallback | Common home for a socks5h:// value |
| no_proxy | Hosts to send directly | Comma-separated list, no spaces |
The proxy URL itself is usually http://, even when the request goes to an HTTPS site. The scheme in https_proxy describes how you reach the proxy, not the target.
Start with a temporary setup that lasts only for the current session. This is the safest way to test credentials before you persist anything.
Linux and macOS (bash or zsh). Export the variables, then confirm them:
# Set the proxy for the current shell session
export http_proxy="http://<your-proxycheap-username>:<your-proxycheap-password>@thehub.proxy-cheap.com:8080"
export https_proxy="$http_proxy"
export all_proxy="$http_proxy"            # used by tools that route every protocol
export no_proxy="localhost,127.0.0.1,.internal.example.com"

# Confirm what is set
env | grep -i proxyTo proxy just one command without touching the rest of the session, put the variable in front of the command:
# Only this single request uses the proxy
http_proxy="http://<your-proxycheap-username>:<your-proxycheap-password>@thehub.proxy-cheap.com:8080" curl https://httpbin.org/ipWindows (Command Prompt). Use set, and read the proxy URL back with findstr:
set HTTP_PROXY=http://<your-proxycheap-username>:<your-proxycheap-password>@thehub.proxy-cheap.com:8080
set HTTPS_PROXY=%HTTP_PROXY%
set NO_PROXY=localhost,127.0.0.1
set | findstr /I proxyWindows (PowerShell). Assign the $env: variables for the session:
$env:HTTP_PROXY  = "http://<your-proxycheap-username>:<your-proxycheap-password>@thehub.proxy-cheap.com:8080"
$env:HTTPS_PROXY = $env:HTTP_PROXY
$env:NO_PROXY    = "localhost,127.0.0.1"
Get-ChildItem Env: | Where-Object Name -match "PROXY"On Windows, environment variable names are case-insensitive, so HTTP_PROXY and http_proxy are the same value. On Linux and macOS the case matters, which is the source of a common error covered later.
Once the credentials work, persist them so every new shell picks them up.
Per-user shell profile (Linux and macOS). Append the exports to ~/.bashrc or ~/.zshrc, then reload:
echo 'export http_proxy="http://<your-proxycheap-username>:<your-proxycheap-password>@thehub.proxy-cheap.com:8080"' >> ~/.bashrc
echo 'export https_proxy="$http_proxy"' >> ~/.bashrc
source ~/.bashrcSystem-wide (Linux). Add the values to /etc/environment without the export keyword so every user and service inherits them:
http_proxy="http://<your-proxycheap-username>:<your-proxycheap-password>@thehub.proxy-cheap.com:8080"
https_proxy="http://<your-proxycheap-username>:<your-proxycheap-password>@thehub.proxy-cheap.com:8080"
no_proxy="localhost,127.0.0.1"Per-tool config files. curl and wget each read their own file on every run, which keeps credentials out of your shell history. A ~/.curlrc looks like this:
# ~/.curlrc is read on every curl invocation
proxy = "http://thehub.proxy-cheap.com:8080"
proxy-user = "<your-proxycheap-username>:<your-proxycheap-password>"Windows (persistent). Write the variables to the user environment so they survive new sessions and reboots:
[Environment]::SetEnvironmentVariable("HTTP_PROXY","http://<your-proxycheap-username>:<your-proxycheap-password>@thehub.proxy-cheap.com:8080","User")
[Environment]::SetEnvironmentVariable("HTTPS_PROXY","http://<your-proxycheap-username>:<your-proxycheap-password>@thehub.proxy-cheap.com:8080","User")For Windows services that use the WinHTTP stack rather than environment variables, set the machine proxy with netsh:
netsh winhttp set proxy thehub.proxy-cheap.com:8080
netsh winhttp show proxy
netsh winhttp reset proxycurl is the workhorse of terminal networking, and it reads the environment variables above automatically. You can also pass the proxy inline, which is the cleaner pattern for scripts. The complete guide to using curl with a proxy goes further, but these four commands cover the essentials:
# 1. One-off proxy for a single request, credentials in a separate flag
curl -x http://thehub.proxy-cheap.com:8080 \
     -U "<your-proxycheap-username>:<your-proxycheap-password>" \
     https://httpbin.org/ip

# 2. Same request, relying on the exported http_proxy and https_proxy variables
curl https://httpbin.org/ip

# 3. SOCKS5 with remote DNS (socks5h resolves the hostname at the proxy)
curl -x socks5h://thehub.proxy-cheap.com:8080 \
     -U "<your-proxycheap-username>:<your-proxycheap-password>" \
     https://httpbin.org/ip

# 4. Send one host directly, proxy everything else
curl --noproxy "internal.example.com" https://httpbin.org/ipTwo practical notes from real use. First, prefer -U (or --proxy-user) over embedding credentials in the proxy URL. curl keeps the credentials out of URL parsing, which avoids errors when a password contains characters like @, :, or #. Second, https://httpbin.org/ip echoes the outbound IP back to you, so it is the fastest way to confirm the proxy is actually in the path.
wget also reads http_proxy and https_proxy, so once the variables are exported a plain wget https://example.com/file.zip already routes through the proxy. When you want to be explicit, pass the settings with -e. The wget with a proxy guide has the full reference; the common patterns are:
# Pass proxy settings inline for this download only
wget -e use_proxy=yes \
     -e http_proxy=http://<your-proxycheap-username>:<your-proxycheap-password>@thehub.proxy-cheap.com:8080 \
     -e https_proxy=http://<your-proxycheap-username>:<your-proxycheap-password>@thehub.proxy-cheap.com:8080 \
     https://example.com/file.zip

# Keep credentials in separate flags instead of the URL
wget --proxy-user="<your-proxycheap-username>" \
     --proxy-password="<your-proxycheap-password>" \
     -e use_proxy=yes -e http_proxy=http://thehub.proxy-cheap.com:8080 \
https://example.com/file.zipFor repeated jobs, set the values once in ~/.wgetrc so you do not retype them:
use_proxy = on
http_proxy = http://thehub.proxy-cheap.com:8080
https_proxy = http://thehub.proxy-cheap.com:8080
proxy_user = <your-proxycheap-username>
proxy_password = <your-proxycheap-password>Many tools honor the environment variables, but several have their own proxy settings worth knowing.
git config --global http.proxy http://<your-proxycheap-username>:<your-proxycheap-password>@thehub.proxy-cheap.com:8080
git config --global https.proxy http://<your-proxycheap-username>:<your-proxycheap-password>@thehub.proxy-cheap.com:8080
# later: git config --global --unset http.proxynpm config set proxy http://<your-proxycheap-username>:<your-proxycheap-password>@thehub.proxy-cheap.com:8080
npm config set https-proxy http://<your-proxycheap-username>:<your-proxycheap-password>@thehub.proxy-cheap.com:8080pip install --proxy http://<your-proxycheap-username>:<your-proxycheap-password>@thehub.proxy-cheap.com:8080 requests# /etc/apt/apt.conf.d/95proxies
Acquire::http::Proxy "http://<your-proxycheap-username>:<your-proxycheap-password>@thehub.proxy-cheap.com:8080";
Acquire::https::Proxy "http://<your-proxycheap-username>:<your-proxycheap-password>@thehub.proxy-cheap.com:8080";# In the [ProxyList] section of /etc/proxychains4.conf, add one of:
# http thehub.proxy-cheap.com 8080 <your-proxycheap-username> <your-proxycheap-password>
# socks5 thehub.proxy-cheap.com 8080 <your-proxycheap-username> <your-proxycheap-password>
proxychains4 curl https://httpbin.org/ip
proxychains4 python scraper.pyEverything above uses placeholder credentials. Here is where the real values come from and how the request actually travels.
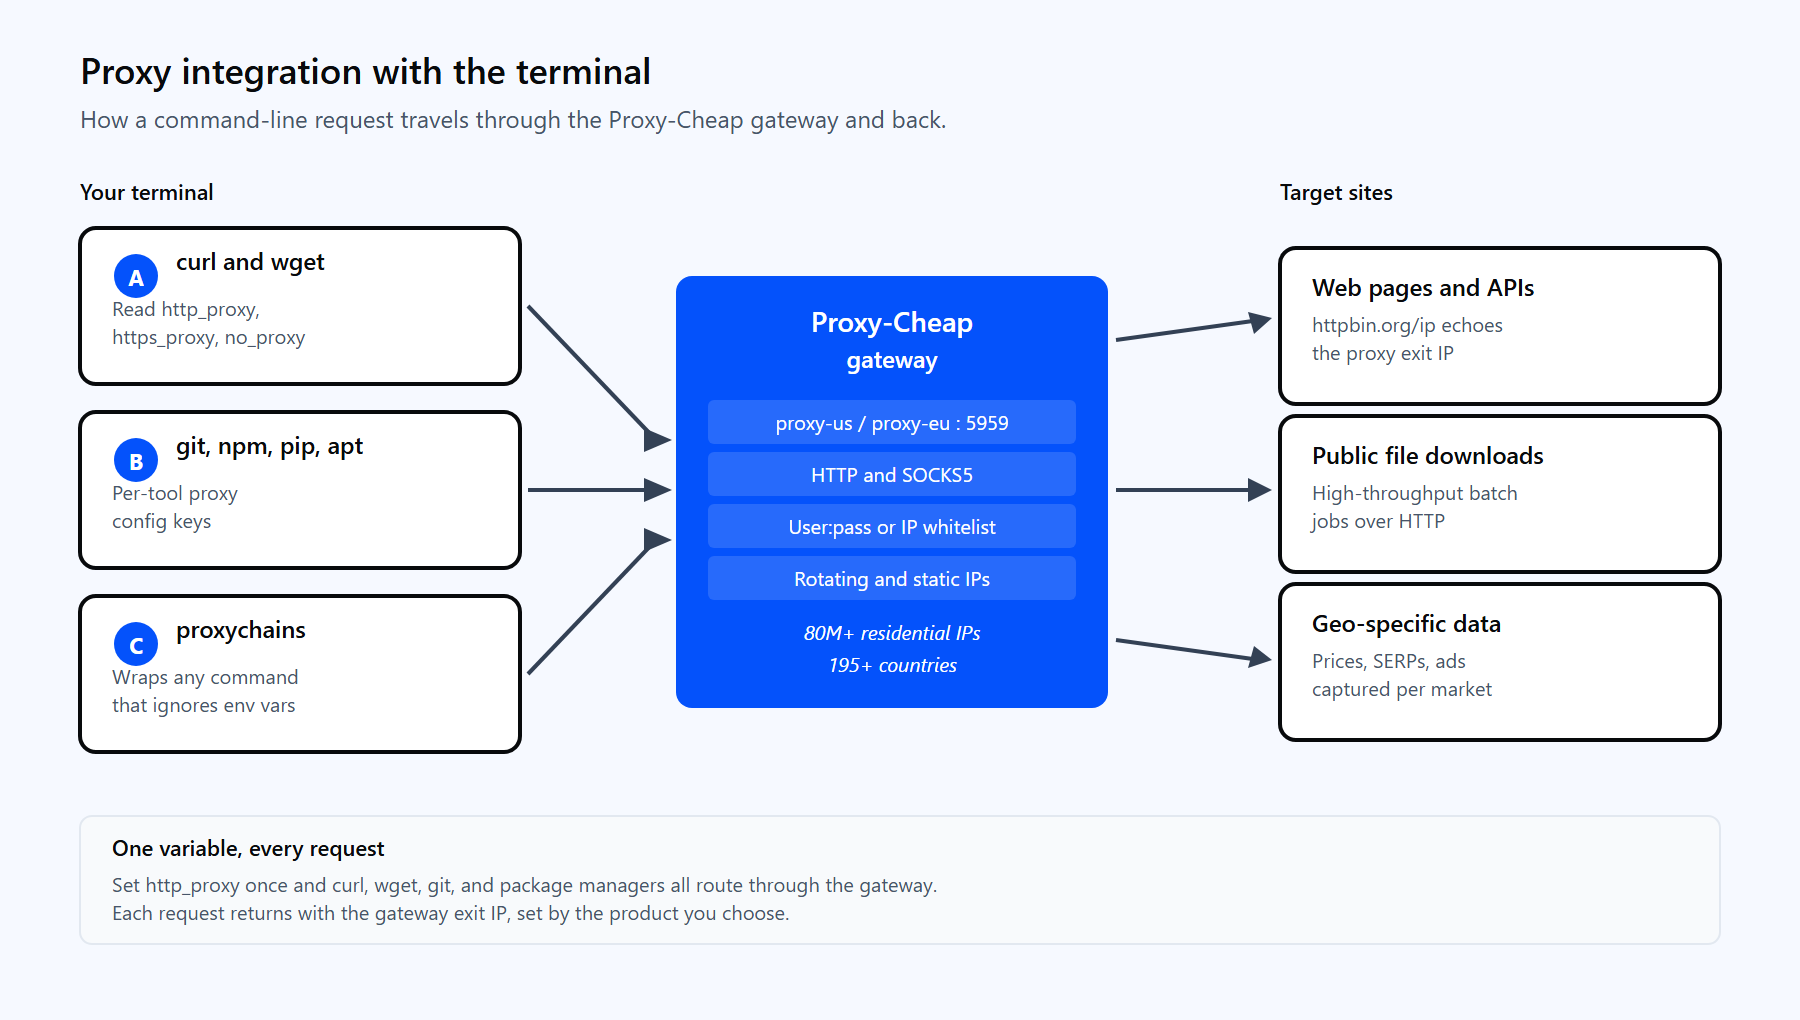
A single proxy environment variable or curl flag routes the request through the Proxy-Cheap gateway and back. The exit IP is set by the product you choose.
Proxy-Cheap delivers credentials in standard host:port plus username:password form, generated in the Setup Credentials panel of the dashboard. The endpoint format differs by product:
So a working rotating-residential setup is one export line plus a test:
export http_proxy="http://<your-proxycheap-username>:<your-proxycheap-password>@thehub.proxy-cheap.com:8080"
export https_proxy="$http_proxy"
curl https://httpbin.org/ip # should print a Proxy-Cheap exit IP, not your ownThree details that save time:
Rotation works two ways depending on the product:
This bash loop walks a list of static proxies across a batch of URLs, one IP after another:
#!/usr/bin/env bash
# Cycle a list of static proxies across many requests
proxies=(
  "http://<your-proxycheap-username>:<your-proxycheap-password>@gate-a.proxy-cheap.com:PORT"
  "http://<your-proxycheap-username>:<your-proxycheap-password>@gate-b.proxy-cheap.com:PORT"
)
i=0
while read -r url; do
  p="${proxies[$((i % ${#proxies[@]}))]}"
  curl -s -x "$p" "$url" -o "page-$i.html"
  i=$((i + 1))
done < urls.txtChoosing between the two comes down to how long you need one IP to last. For a deeper breakdown, read static vs rotating proxies. Rotating residential is the default for high-volume, geo-spread jobs; static residential and ISP proxies win when a workflow needs one consistent IP for hours or days, such as an authenticated API session driven from a script.
Most terminal proxy failures fall into a handful of buckets.
1. 407 Proxy Authentication Required. The proxy got no credentials or the wrong ones. Pass them explicitly with curl -U "user:pass" -x host:port, or fix the username and password in your environment variable. Confirm the values against the dashboard.
2. The proxy works for HTTP but not HTTPS. You set http_proxy but not https_proxy, so HTTPS targets go direct or fail. Almost all real traffic is HTTPS, so always set both variables together.
3. Uppercase HTTP_PROXY is ignored on Linux or macOS. curl reads the HTTP variable in its lowercase form only, a safeguard tied to the CGI protocol. Use http_proxy in lowercase. (On Windows the names are case-insensitive, so either works.)
4. SOCKS5 returns "could not resolve host" or the wrong region. Your machine is resolving DNS locally instead of at the proxy. Switch the scheme from socks5:// to socks5h:// so the proxy performs the lookup.
5. sudo apt or sudo curl ignores your proxy. sudo does not pass your environment variables to the elevated command. Run sudo -E curl ... to keep them, or set the proxy in /etc/environment or the apt config so it does not depend on your shell at all.
6. A password with special characters breaks the URL. Characters like @, :, #, and spaces confuse URL parsing. URL-encode them (@ becomes %40, : becomes %3A, # becomes %23) or, better, keep the password out of the URL with curl -U 'user:pass'.
7. no_proxy is not honored. Check the formatting: a comma-separated list with no spaces, and a leading dot (.example.com) to match subdomains. Setting no_proxy="*" sends every host directly.
The right product depends on the shape of the job, not the size of the budget. Match the workflow to the proxy type before you commit.
| Terminal workflow | First choice | Also works |
|---|---|---|
| Geo-specific data from curl or wget | Rotating residential | Static residential |
| High-volume downloads of public files | Datacenter | ISP |
| Session-bound CLI (logins, dashboards via API) | Static residential | ISP |
| Trusted long-lived API sessions | ISP | Static residential |
| Quick one-off requests and scripting | Datacenter | Rotating residential |
| CI pipeline from a fixed server (IP whitelist) | ISP | Static residential |
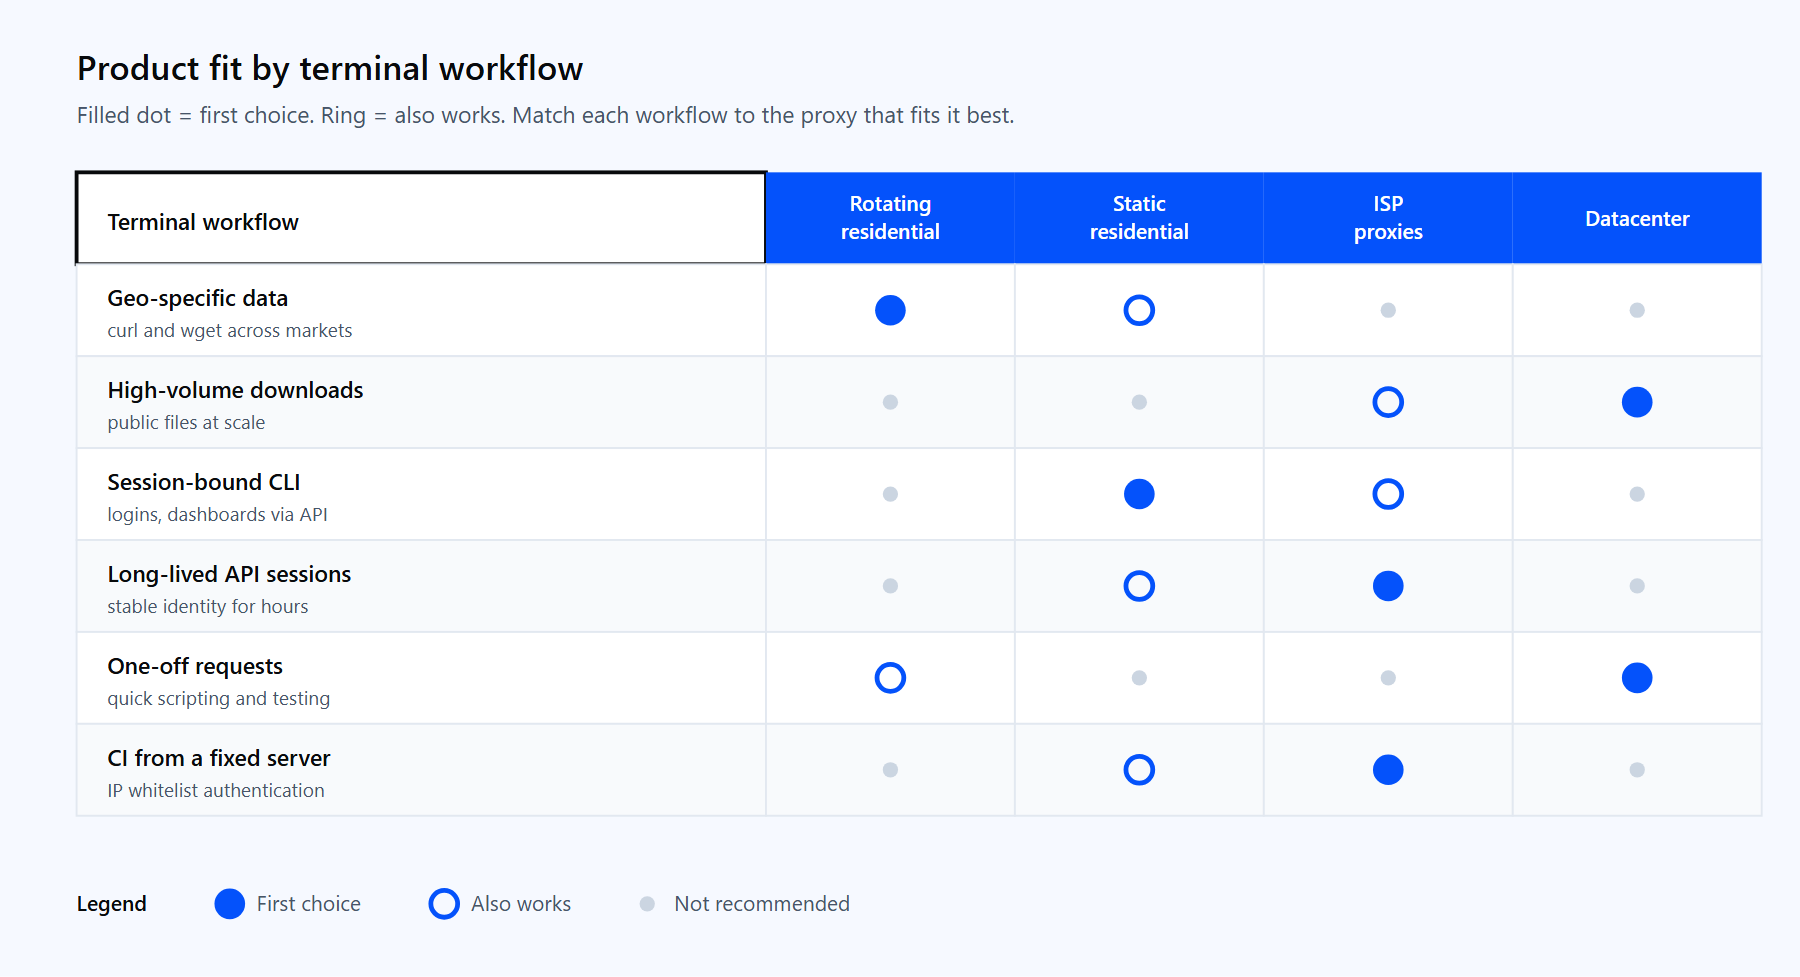
Pick the product by the shape of the workload: geo-specific data, high-throughput downloads, or session-bound CLI tools.
For high-throughput downloads of public files and documentation, datacenter proxies deliver predictable per-IP pricing and the speed a batch job needs. For geo-specific data, the rotating residential gateway is the default. Whichever you pick, the terminal setup is the same: one gateway line, your credentials, and a curl https://httpbin.org/ip to confirm the exit IP, all on pay-as-you-go pricing with no monthly commitment.