Key takeaways:
What is Norconex?
Norconex Web Crawler is an open-source, enterprise-grade web crawler written in Java. You give it one or more start URLs and a configuration file, and it walks the site, extracts text and metadata from each page, and hands the result to a "committer" that stores it wherever you want: Apache Solr, Elasticsearch, Neo4j, an SQL database, or a plain file on disk.
The project was previously named the Norconex HTTP Collector, and you will still see that name in older tutorials and in the Java package paths (com.norconex.collector.http). The current stable line is Norconex Web Crawler 3.1.0, released on 2025-05-24, and it now lives alongside a filesystem crawler in a single repository. It runs on Java 11 or later (the examples in this guide were tested on Java 21).
Two things set Norconex apart from a quick scraping script. First, it is a full crawler, not a single-page fetcher: it handles link discovery, depth limits, politeness delays, robots rules, canonical URLs, sitemaps, and incremental re-crawls out of the box. Second, its pipeline is modular. The crawler collects, the importer parses and transforms, and the committer ships the data to your repository, and you configure each stage in XML without writing Java.
What is Norconex used for?
Norconex is built for teams that need to turn large chunks of the public web into structured, searchable content. The common applications:
The unifying thread is scale plus structure. Norconex is a good fit when you need repeatable, scheduled crawls of many pages and a clean handoff into a search platform or database.
Key features of Norconex
The features that matter most for production crawling:
Is Norconex free to use?
Yes. Norconex Web Crawler is released under the Apache License 2.0, which permits commercial use. There is no license key, no seat limit, and no usage cap in the software itself. You download the distribution, run it on your own hardware, and pay nothing to the project.
Operational costs come from your own infrastructure only: the servers that run the crawler and the Java heap you allocate to it, the repository you commit to (a hosted Elasticsearch cluster, for example), and proxies once you crawl at any real volume. The entire feature set in this guide works on the free, self-hosted distribution.
How to install Norconex
Norconex ships as a self-contained zip. You need a Java runtime (version 11 or later) and nothing else. Confirm Java first:
java -version
# Expect "11" or higher, for example: openjdk version "21.0.10"
Download and unpack the version 3.1.0 web crawler distribution. The binary is published on Maven Central:
# Download the distribution zip (about 120 MB)
curl -L -o norconex.zip \
https://repo1.maven.org/maven2/com/norconex/collectors/norconex-collector-http/3.1.0/norconex-collector-http-3.1.0.zip
# Unpack it
unzip norconex.zip
cd norconex-collector-http-3.1.0
The folder contains two launch scripts, one per platform, plus a lib directory with the jars and an examples folder with ready-to-run configurations:
Run the bundled minimum example to confirm the install works end to end:
# Windows
collector-http.bat start -config=examples\minimum\minimum-config.xml
# Linux or macOS
./collector-http.sh start -config=examples/minimum/minimum-config.xml
If it prints a startup banner and a crawl summary without an error, you are ready to write your own configuration.
Quickstart: your first Norconex crawl
A Norconex crawl is driven entirely by an XML configuration file. The smallest useful config sets a work directory, one start URL, a depth limit, a politeness delay, and a committer that writes results to disk. Save the following as my-config.xml:
<?xml version="1.0" encoding="UTF-8"?>
<httpcollector id="my-first-collector">
<!-- Where Norconex stores its crawl state and output. -->
<workDir>./output</workDir>
<crawlers>
<crawler id="my-first-crawl">
<!-- At least one start URL is required. -->
<startURLs stayOnDomain="true" stayOnPort="true" stayOnProtocol="true">
<url>https://opensource.norconex.com/crawlers/web/</url>
</startURLs>
<!-- Depth 0 crawls only the start URL. Raise it to follow links. -->
<maxDepth>0</maxDepth>
<!-- Be polite: wait between requests to the same site. -->
<delay default="2 seconds"/>
<!-- Keep only the fields you care about. -->
<importer>
<postParseHandlers>
<handler class="KeepOnlyTagger">
<fieldMatcher method="csv">title,description,document.reference</fieldMatcher>
</handler>
</postParseHandlers>
</importer>
<!-- Write each crawled document to a JSON file. -->
<committers>
<committer class="JSONFileCommitter">
<indent>2</indent>
</committer>
</committers>
</crawler>
</crawlers>
</httpcollector>
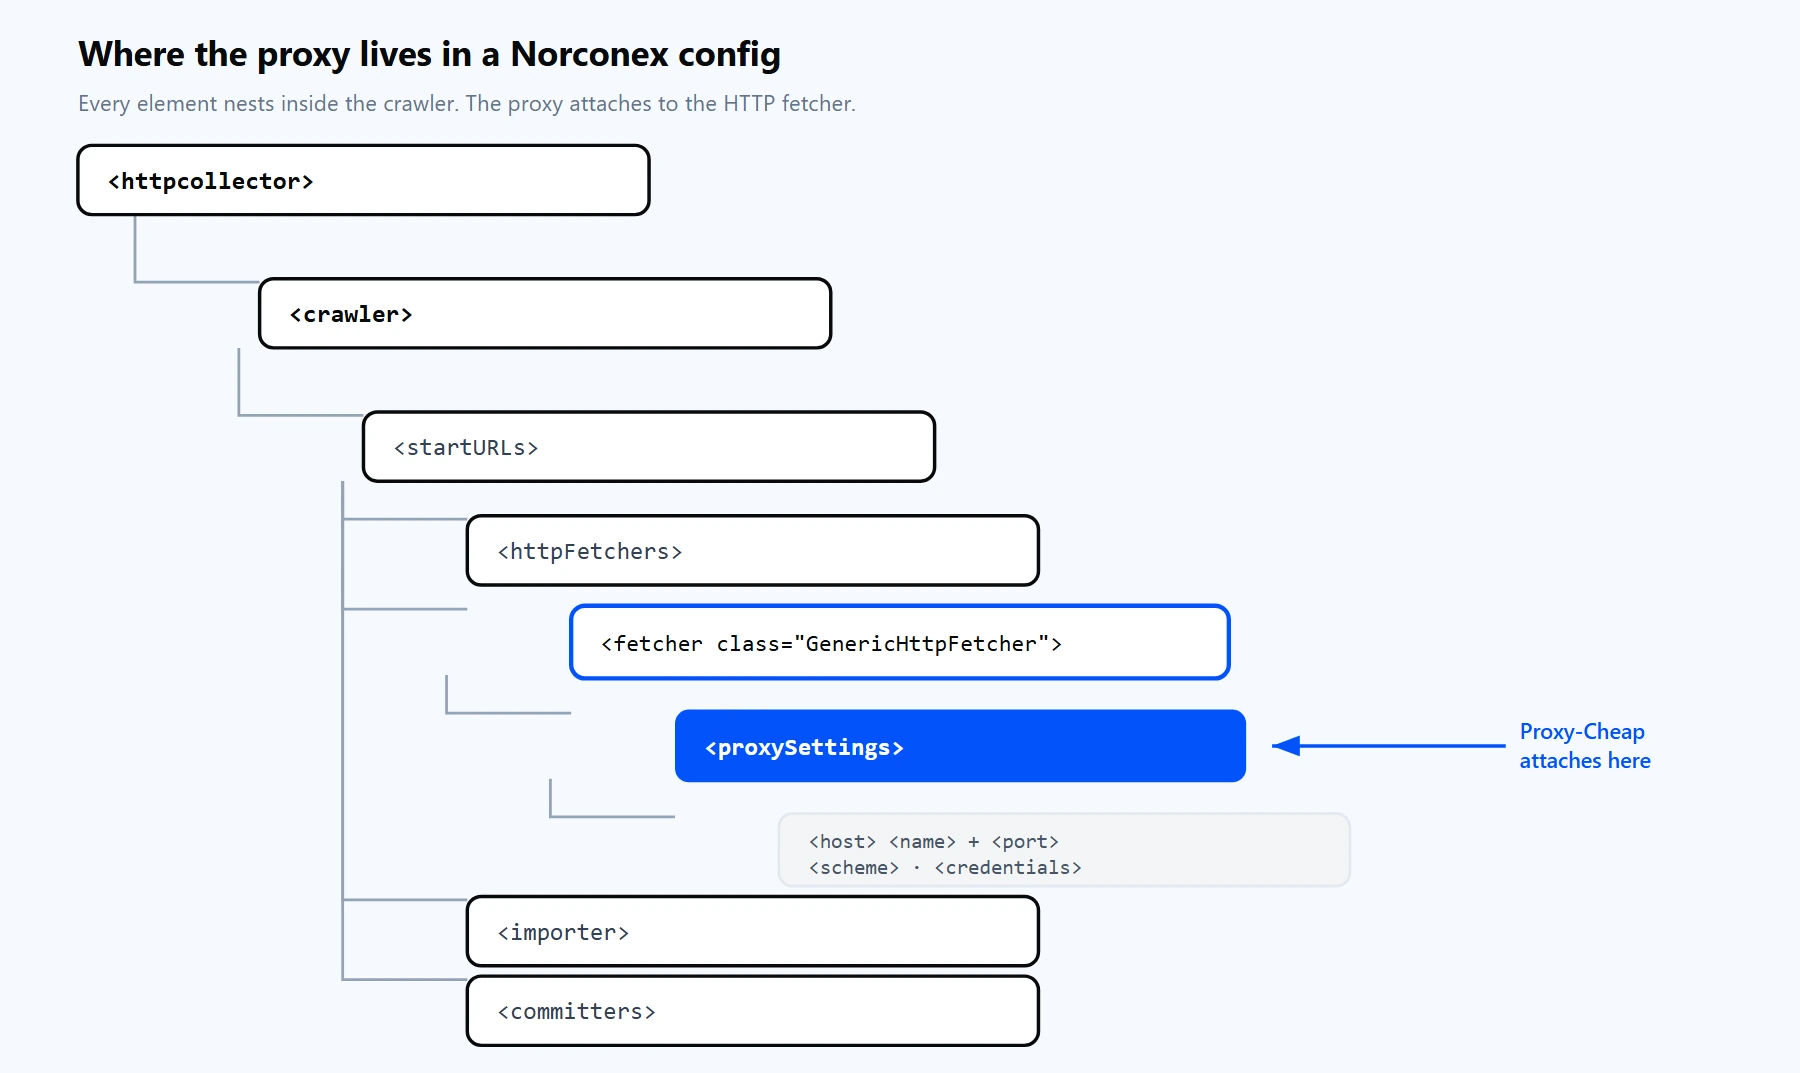
The Norconex config is a nested tree. Proxy settings live on the HTTP fetcher inside each crawler, which is exactly where you will add them next.
Run it with the launch script and the start action:
# Windows
collector-http.bat start -config=my-config.xml
# Linux or macOS
./collector-http.sh start -config=my-config.xml
Norconex prints a banner listing the component versions, then logs each URL as it is queued, processed, and committed. A clean run ends with an execution summary showing how many documents were processed and committed.
One tip that saves a lot of confusion: Norconex keeps crawl state in the work directory between runs so it can do incremental crawls. When you change your config and want a fresh start, delete the work directory (or point workDir somewhere new) so old references are not carried over.
What is the output of Norconex?
Norconex does not print scraped data to your screen. It sends each crawled document to whichever committer you configured. With the JSONFileCommitter from the quickstart, every document becomes a JSON record on disk under the crawler's committer folder. A single record looks like this:
[
{
"upsert": {
"reference": "https://opensource.norconex.com/crawlers/web/",
"metadata": {
"title": [ "Norconex Web Crawler" ],
"description": [ "Powerful and flexible open-source Enterprise Web Crawler." ],
"document.reference": [ "https://opensource.norconex.com/crawlers/web/" ]
},
"content": "Norconex Web Crawler. Open-Source Enterprise Crawler. Crawl web content ..."
}
}
]
Each record carries three things: a reference (the URL), a metadata map (title, description, and any fields you kept in the importer), and the extracted content. The committer decides where that record goes. Swap JSONFileCommitter for XMLFileCommitter to get XML files, or for ElasticsearchCommitter or SolrCommitter to index straight into a search engine. The crawler and importer stages stay exactly the same; only the committer changes.
Why you need a proxy with Norconex
A single server IP is fine for crawling a handful of pages on a friendly site. It stops being fine the moment you run Norconex at the scale it is built for, which is why serious crawls route through a residential proxy network. For a broader look at what to weigh when choosing a provider, the best proxies for web scraping guide covers the selection criteria. Three concrete reasons to put a proxy in front of every large Norconex crawl:
Proxy-Cheap offers four product lines that map cleanly onto Norconex workloads:
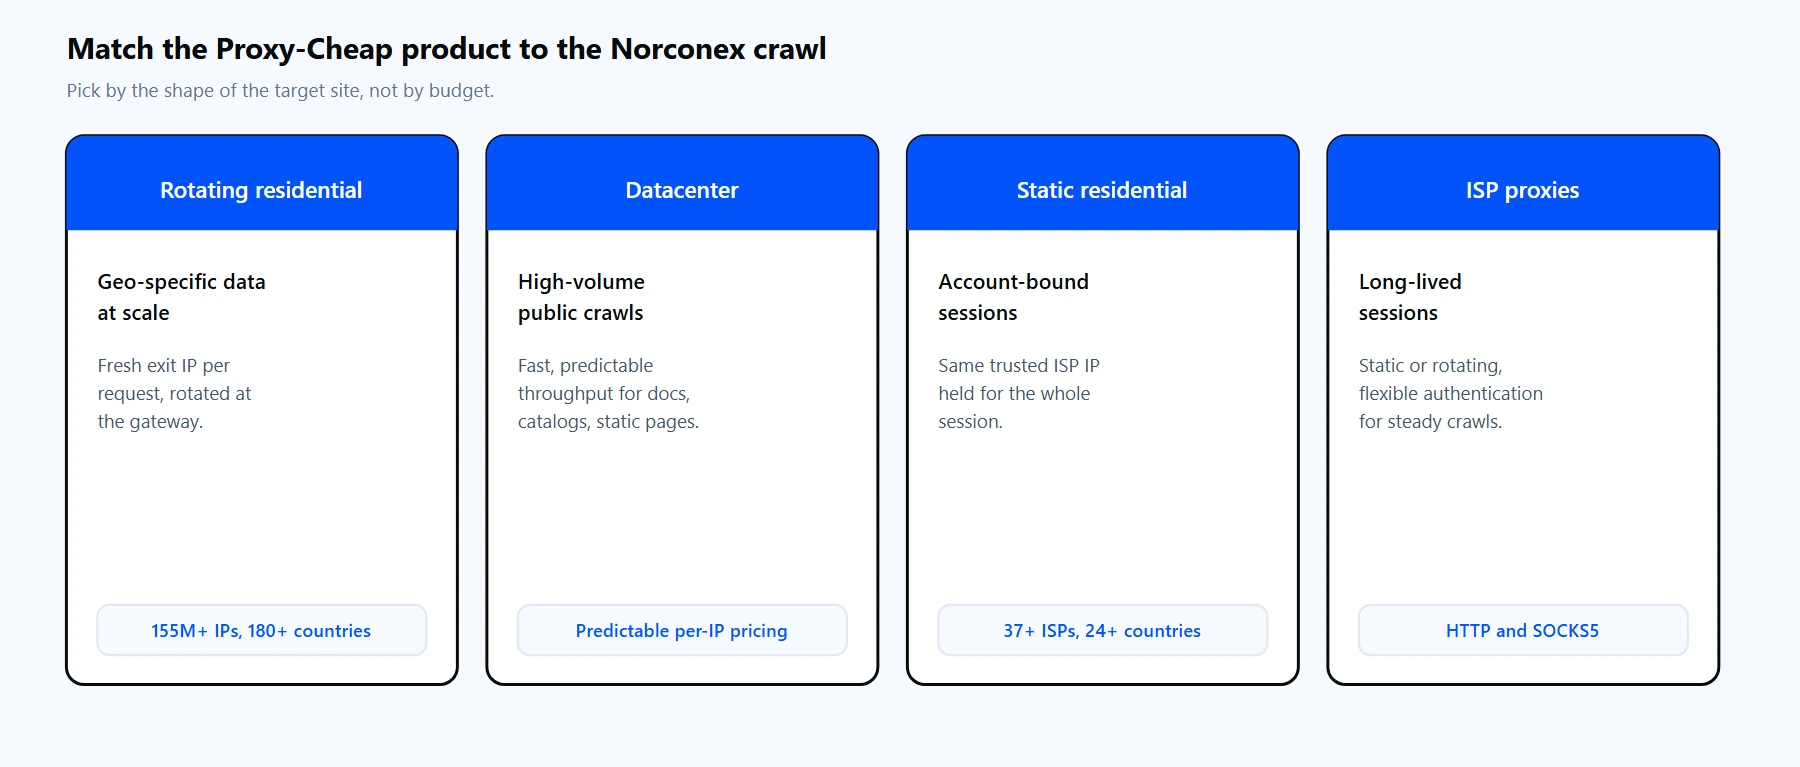
Each product line fits a different shape of crawl. Pick by the target site, not by budget.
For most Norconex projects the answer is one of these four, chosen by the shape of the target site.
How to set up a proxy with Norconex
Proxies attach to the HTTP fetcher, not to the crawler as a whole. In Norconex 3, the default fetcher is GenericHttpFetcher, and it accepts a <proxySettings> element with a nested host, a scheme, and credentials. That element is the entire integration: add it, and every request the crawler makes routes through your Proxy-Cheap IP.
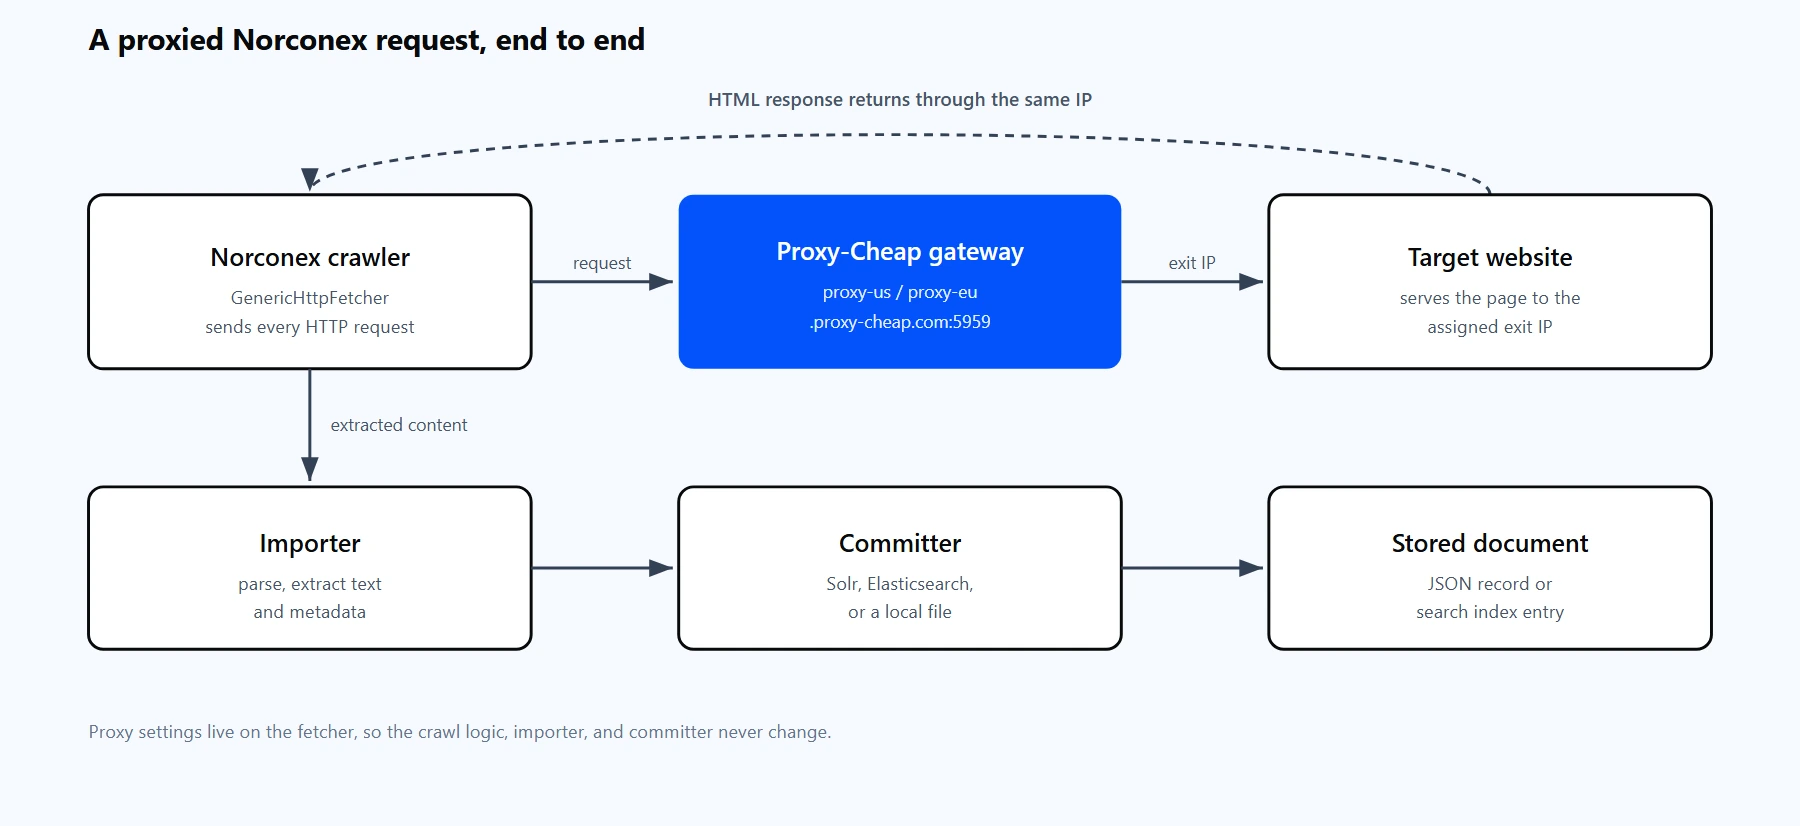
A Norconex request leaves the GenericHttpFetcher, routes through the Proxy-Cheap gateway to the target site, and returns through the importer and committer as a stored record.
A quick note on endpoint format, because it differs by product:
Here is the quickstart config with a proxy added to the fetcher. Only the <httpFetchers> section is new:
<?xml version="1.0" encoding="UTF-8"?>
<httpcollector id="my-first-collector">
<workDir>./output</workDir>
<crawlers>
<crawler id="my-first-crawl">
<startURLs stayOnDomain="true">
<url>https://example.com</url>
</startURLs>
<maxDepth>0</maxDepth>
<delay default="2 seconds"/>
<!-- Route every request through the Proxy-Cheap gateway. -->
<httpFetchers>
<fetcher class="GenericHttpFetcher">
<proxySettings>
<host>
<name>thehub.proxy-cheap.com</name>
<port>8080</port>
</host>
<scheme>http</scheme>
<credentials>
<username>YOUR_PROXYCHEAP_USERNAME</username>
<password>YOUR_PROXYCHEAP_PASSWORD</password>
</credentials>
</proxySettings>
</fetcher>
</httpFetchers>
<committers>
<committer class="JSONFileCommitter">
<indent>2</indent>
</committer>
</committers>
</crawler>
</crawlers>
</httpcollector>
Three practical notes from testing this against the live gateway:
Rotating proxies with Norconex
Norconex applies HTTP fetchers as an ordered chain: it uses the first fetcher that accepts a request, and falls back to the next only when one declines. That is a failover mechanism, not a per-request IP rotator. So the clean way to rotate exit IPs in Norconex is to let the proxy network do the rotation for you at the gateway.
Switching a crawl from one country to another is a change in the dashboard credential generator, not in the config. You select the country there and copy the matching password, which makes running the same config against several markets straightforward:
<proxySettings>
<host>
<name>thehub.proxy-cheap.com</name>
<port>8080</port>
</host>
<scheme>http</scheme>
<credentials>
<username>YOUR_PROXYCHEAP_USERNAME</username>
<password>YOUR_PROXYCHEAP_PASSWORD</password>
</credentials>
</proxySettings>
Rotating residential is the default for high-volume crawling: the gateway hands out a new IP per request, or a sticky session of around 30 minutes when you need the same IP across a short sequence. Static residential (ISP) is the right pick when a crawl needs the same IP to persist for hours, such as session-aware dashboards. For a deeper comparison, read static vs rotating proxies, and for rotation patterns in code, see how to rotate proxies in Python.
Advanced: geo-specific crawls with a custom user agent
Two settings turn a basic proxied crawl into a production one: a proper user agent and sensible timeouts. Norconex logs User-Agent: <None specified> by default, and many sites treat an empty user agent as a reason to throttle. Set one on the fetcher, add connection and socket timeouts so a slow proxy hop does not stall a thread, and pass any headers your target expects. Everything sits alongside the same <proxySettings> element:
<httpFetchers>
<fetcher class="GenericHttpFetcher">
<!-- Identify your crawler honestly. -->
<userAgent>Mozilla/5.0 (compatible; MyCrawler/1.0; +https://example.com/bot)</userAgent>
<!-- Fail fast on slow hops instead of hanging a thread. -->
<connectionTimeout>30000</connectionTimeout>
<socketTimeout>30000</socketTimeout>
<proxySettings>
<host>
<name>thehub.proxy-cheap.com</name>
<port>8080</port>
</host>
<scheme>http</scheme>
<credentials>
<username>YOUR_PROXYCHEAP_USERNAME</username>
<password>YOUR_PROXYCHEAP_PASSWORD</password>
</credentials>
</proxySettings>
<!-- Send request headers your target expects. -->
<headers>
<header name="Accept-Language">en-US,en;q=0.9</header>
</headers>
</fetcher>
</httpFetchers>
Pairing an EU gateway with an Accept-Language header is a simple way to collect the localized version of a page. For sites that render their content with JavaScript, swap GenericHttpFetcher for WebDriverHttpFetcher, which drives a real Chrome or Firefox instance so the page is fully built before Norconex extracts it. The proxy still belongs on the fetcher; the difference is that a browser renders the response first.
Common errors and how to fix them
Most Norconex proxy and setup problems fall into a handful of buckets, each grounded in a real issue from the project's tracker.
1. `407 Proxy Authentication Required`. The gateway rejected your credentials. Check the username and password in the <credentials> element, confirm they are inside <credentials> and not the <host>, and confirm the account has bandwidth or active IPs. A 407 with correct credentials usually means the values were swapped or contain a stray space.
2. Proxy settings ignored or a parse error on startup. You are mixing Norconex versions. The version 2 syntax used GenericHttpFetcherFactory and a flat <host>host:port</host>. Version 3 uses GenericHttpFetcher inside <httpFetchers> with a nested <host><name> and <port>. Use the version 3 form shown above.
3. `java.lang.OutOfMemoryError: Java heap space`. Large crawls exhaust the default heap, often during the fetch stage. Increase the Java heap in the launch script by adding -Xmx2G (or higher) to the java command inside collector-http.bat or collector-http.sh. Lowering numThreads and the maximum document size also helps.
4. SSL handshake failure through the proxy. Some targets negotiate a TLS version or certificate that trips the fetcher. Set <sslProtocols>TLSv1.2,TLSv1.3</sslProtocols> on the fetcher, and for test environments you can set <trustAllSSLCertificates>true</trustAllSSLCertificates>. Leave certificate trust on for production.
5. Nothing gets crawled. Three usual causes: the start URL is disallowed by robots.txt, maxDepth is 0 so only the start page is fetched, or old crawl state is being reprocessed. Delete the work directory for a clean run, raise maxDepth, and if a site's robots rules are the issue for content you are authorized to collect, you can set the sitemap resolver and robots handling per your configuration.
6. Crawl reprocesses old references. Norconex stores state between runs for incremental crawls, so orphaned references from a previous config can reappear. Point workDir at a fresh folder or delete the old one before rerunning after config changes.
7. SOCKS proxy not connecting. The GenericHttpFetcher is built around HTTP proxying, and SOCKS is not supported out of the box on that fetcher. Use the http scheme with a Proxy-Cheap HTTP endpoint, which is the compatible path for Norconex.
Is Norconex good? Pros and cons
For scheduled, large-scale crawling that feeds a search engine or database, Norconex is one of the strongest open-source options. It is free under Apache 2.0, the pipeline model is clean, and the committer ecosystem means you rarely write glue code to reach your repository. A few honest tradeoffs before you commit.
Pros
Cons
The practical middle ground for most teams: run Norconex yourself, commit to your existing search engine, and pair it with a value-tier proxy provider on pay-as-you-go billing. That covers the large majority of enterprise crawling without enterprise-tier overhead.