A proxy server gives your PlayStation a different IP address for its internet traffic. That single change is what makes regional store research, account separation, and a more private home connection possible on a console that has no app store for networking tools. This guide compares the best proxy services for PS5 and PS4 in 2026, explains which proxy type fits which job, and walks through the exact setup on both consoles.
Yes. Both the PS5 and the PS4 have a built-in Proxy Server option inside their network settings, so you do not need any extra app on the console itself.
There is one detail that decides your whole setup: the console proxy screen accepts only an Address (a hostname or IP) and a Port Number. It has no username or password field. That means an authenticated proxy, the kind that asks for a login, cannot connect directly. You have two clean ways around this:
Everything else in this guide builds on that one fact. Pick a proxy that supports IP whitelisting and the console setup takes about two minutes.
A proxy is useful on a console for a handful of practical, everyday reasons.
The common thread is control over the IP your console uses. Once you have that, the use case is up to you.
Not every proxy works well on a console. Use these criteria to choose.
Here are six proxy services that work well for console setups, ranked by overall fit for PS5 and PS4. Pricing shifts often across the industry, so treat figures as a starting point and confirm on each provider's site.
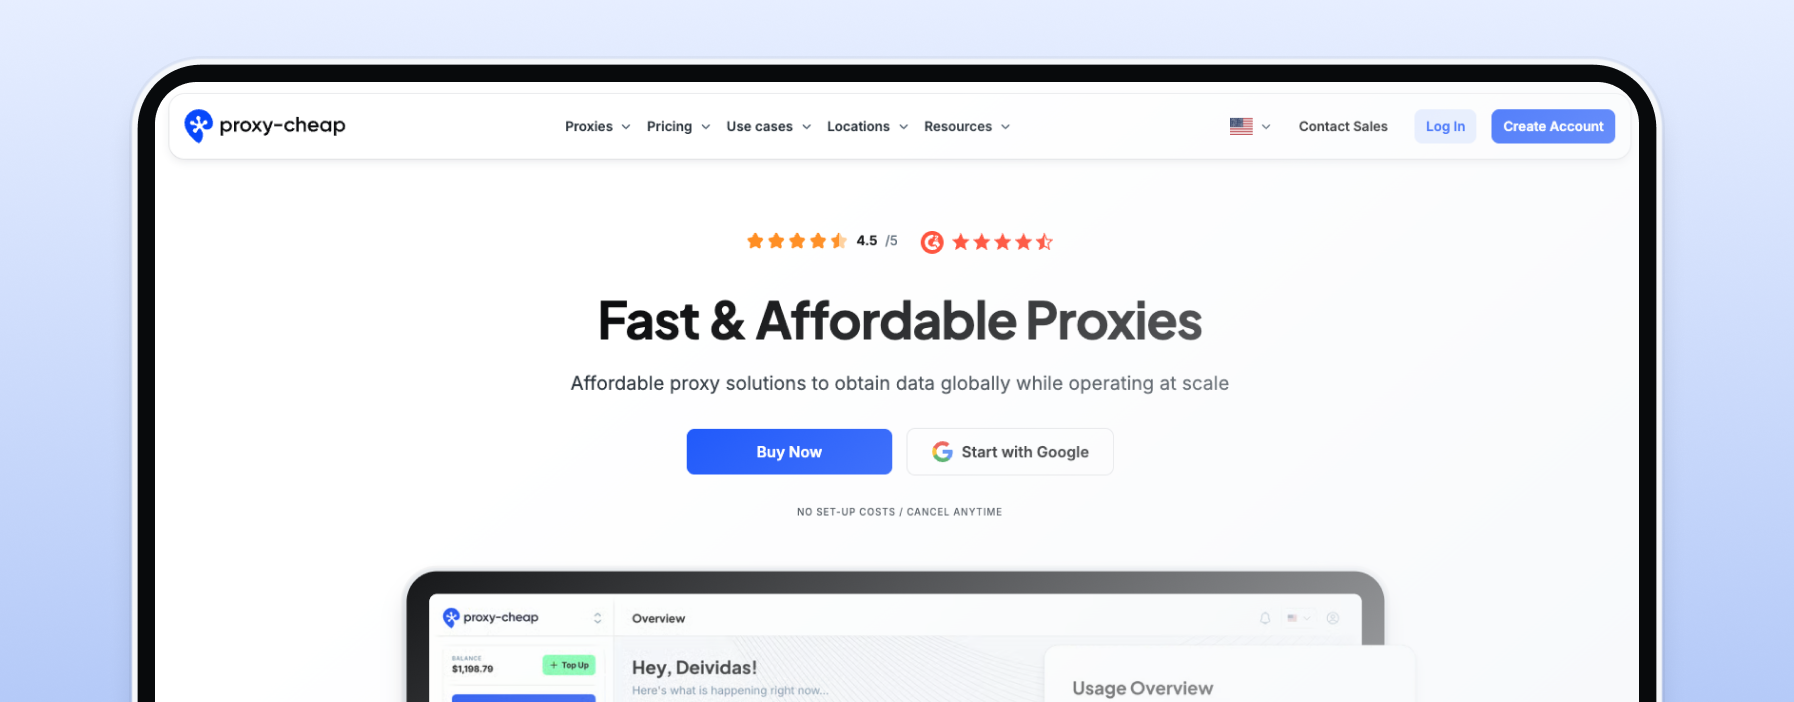
Proxy-Cheap is our top pick because its lineup lines up neatly with how a console actually connects. IP-whitelist authentication is available on the datacenter and static residential (ISP) lines, so you can plug an address and port straight into the console after authorizing your IP. Pricing is pay-as-you-go with no setup costs, payment options include crypto, and the network spans 100+ countries for region selection. With residential, datacenter, ISP, and mobile products under one account, you can switch the proxy type to the task without changing providers. It is a strong fit for both a one-time setup and an always-on console.
IPRoyal markets a dedicated PS4 and PS5 proxy page, which makes onboarding simple, and its ISP proxies support IP whitelisting. Datacenter IPs start around $1.39 each and ISP IPs around $2.40 each. A nice touch for occasional players is that residential traffic does not expire, so data you buy stays usable until you need it.
Webshare is the easy on-ramp for trying a console proxy without spending anything. Its free tier includes 10 datacenter proxies with up to 1 GB a month and no card required, and IP authorization lets you connect with just an address and port. Paid datacenter plans start around $2.99 a month. Note that base plans authorize a single IP by default, which is usually fine for one home network.
Oxylabs sits at the premium end and is a solid choice if you want a polished dashboard and strong support. Its ISP proxies come with unlimited bandwidth under fair use across 22 locations, with IP whitelisting for up to 10 addresses. For a console, lean on the ISP or datacenter lines rather than residential, and remember that whitelisting pairs with HTTP rather than SOCKS5 on most tiers.
Decodo, formerly Smartproxy, pairs a large IP pool with a beginner-friendly dashboard. Datacenter and static residential proxies both offer a choice of username and password or IP whitelisting, and a short datacenter free trial lets you test before you commit. With 195+ locations, it is a good pick when you want flexibility in region selection.
Bright Data is the scale option, with a very large ISP and datacenter footprint across 195 countries. IP-only access is supported through its Proxy Manager, so you can connect by address and port once your IP is allowlisted. It carries more configuration than the others, which suits power users more than first-timers, but the coverage is hard to beat.
Each Proxy-Cheap product is built for a different shape of work. For a deeper split, see datacenter vs residential proxies.
For most players, a static residential (ISP) or datacenter IP with whitelisting is the simplest path to a working console setup.
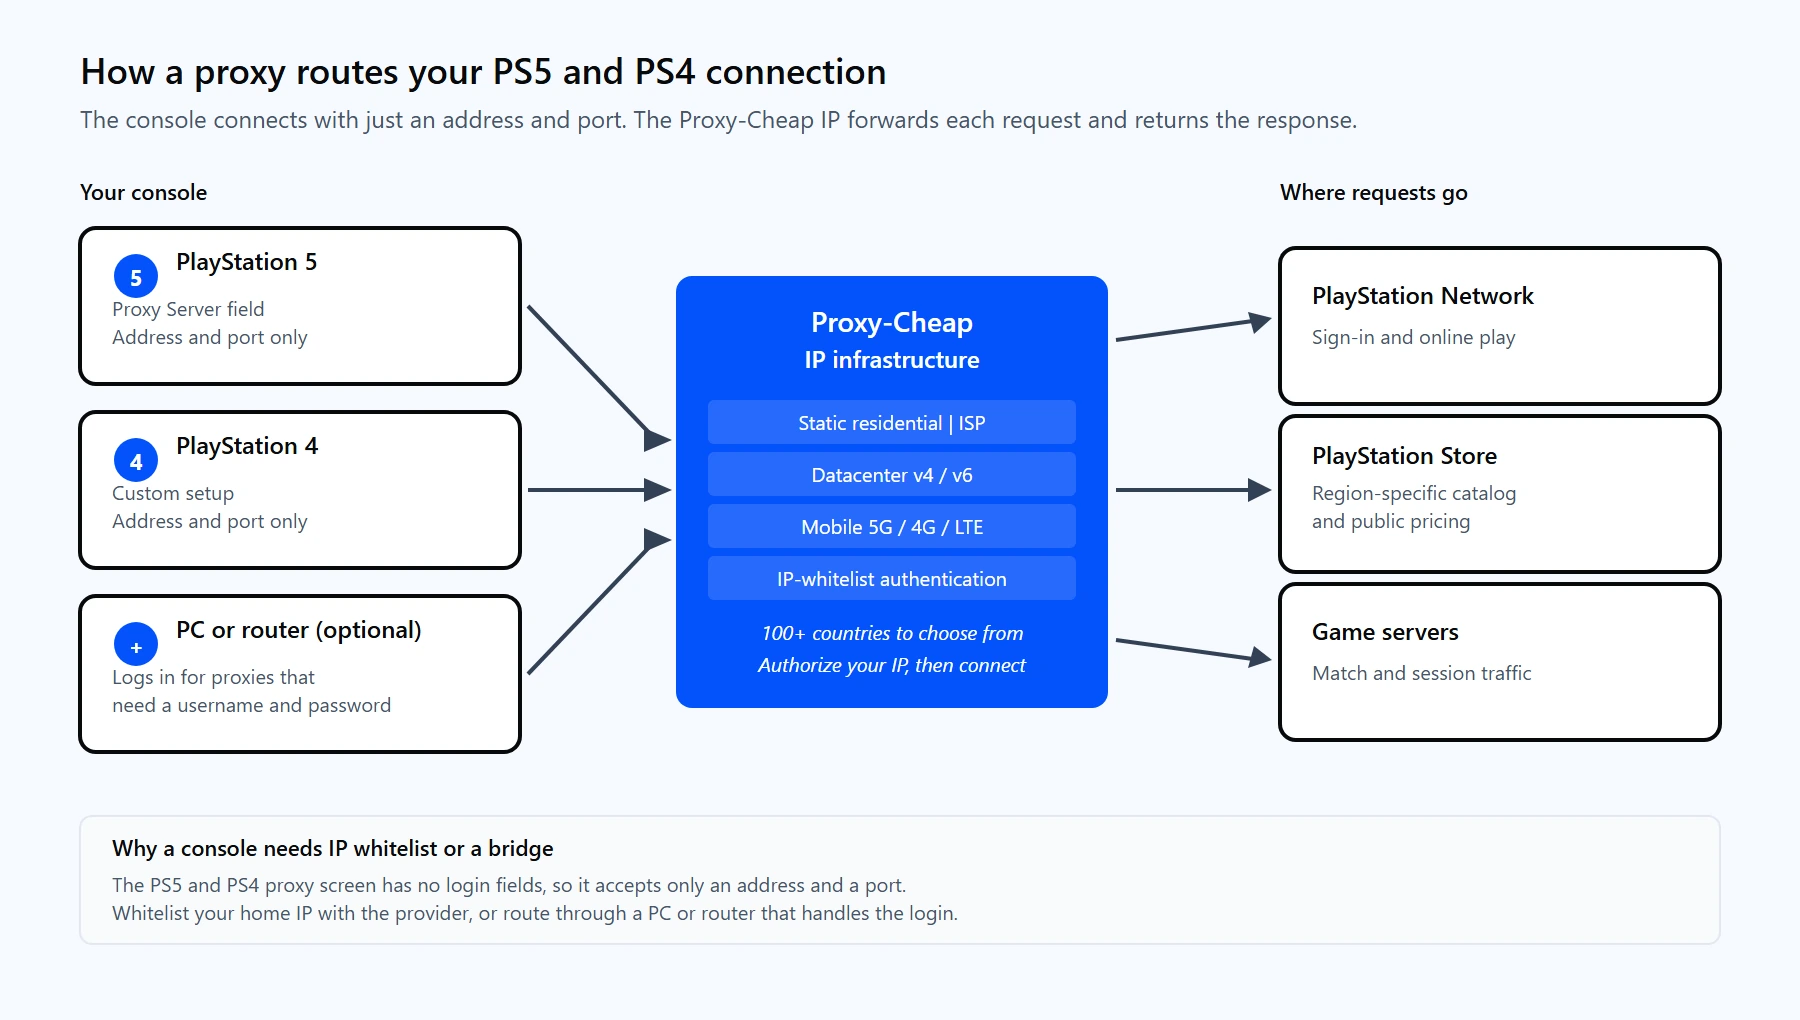
Your console sends each request to a Proxy-Cheap IP, which forwards it to the PlayStation Network and returns the response. Whitelist your home IP first so the console can connect with just an address and port.
Before you start, authorize your home network's public IP in your Proxy-Cheap dashboard and copy the proxy address and port. Then follow these steps.
The PS4 flow is almost identical, with slightly different menu wording.
If your proxy needs a username and password
Because neither console can send a login, an authenticated proxy needs one of these approaches.
These three tools get mixed up constantly, so here is the short version.
One point clears up most confusion: a value like 8.8.8.8 is a DNS server, not a proxy. It belongs in DNS Settings and never in the Proxy Server address field.
Most console proxy issues come from a small set of causes. This table covers the ones you are most likely to hit.
| Problem | Likely cause | Fix |
| "Cannot connect to the proxy server" | Your current IP is not on the proxy's allowlist | Add your public IP in the dashboard, then test again |
| Connection test stops at PSN sign-in | Wrong address or port, or the proxy needs a login the console cannot send | Recheck the address and port, and switch to an IP-whitelisted proxy or a bridge |
| Setup ignores the proxy entirely | You chose Easy on PS4, or skipped Advanced Settings on PS5 | Restart setup and pick Custom (PS4) or Advanced Settings (PS5) |
| Slow or uneven connection | A shared or distant IP | Pick a location nearer the game's servers, or move to a dedicated ISP or residential IP |
| 8.8.8.8 sits in the Proxy field | A DNS value placed on the wrong screen | Put 8.8.8.8 under DNS Settings; the proxy screen takes only the proxy address and port |
| A SOCKS5 proxy will not connect | The console field expects an HTTP proxy | Use an HTTP proxy on the console, or run SOCKS5 through a PC or router bridge |
Using proxy technology is legal in general terms, and proxies are an everyday tool for privacy and testing. For a fuller look at the topic, see are proxies legal. The risk is never the proxy itself, it is what you do with it.
Keep your use within PlayStation's Terms of Service. Use a proxy for legitimate purposes such as a more private connection, account management that matches your market, or public store research, and avoid anything that breaks PlayStation's rules. Doing so can put your account or console at risk. This is general information rather than legal advice, so check PlayStation's current terms if you are unsure.
To stay on the safe side, choose a reputable provider, use a dedicated IP rather than a free shared one, and keep your account details private.
Here is how the Proxy-Cheap product lines map onto common console tasks. Use it to pick the right one before you buy.
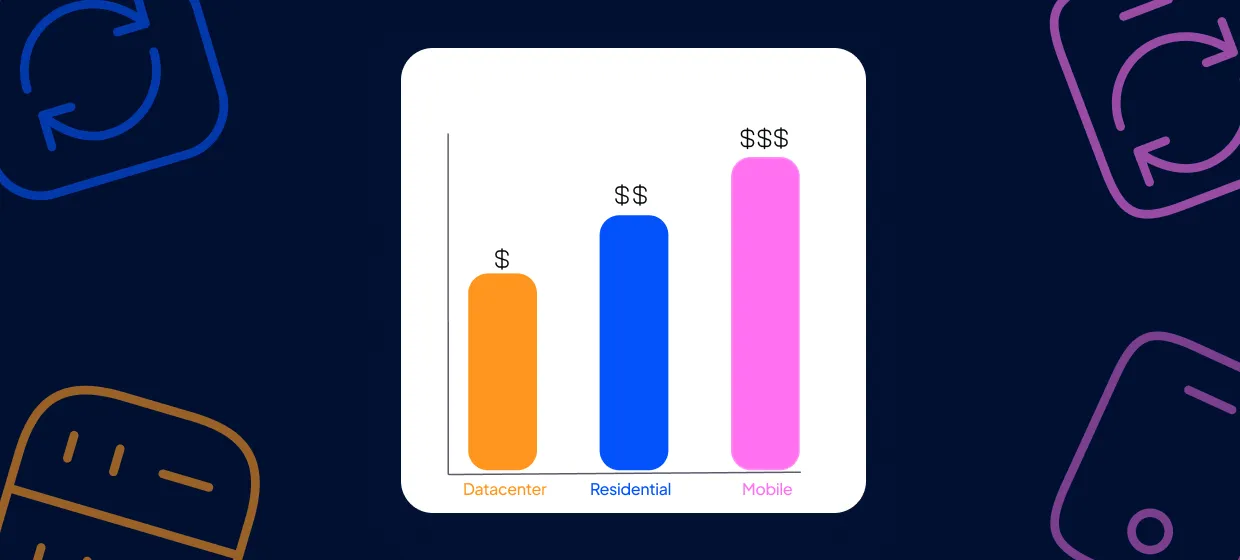
| Console task | Static residential (ISP) | Datacenter | Mobile | Rotating residential |
| Stable, real-IP identity | Best | Good | Good | Workable |
| Fast downloads on a budget | Good | Best | Workable | Good |
| Region selection for the Store | Best | Good | Good | Best |
| Highest trust on strict platforms | Good | Workable | Best | Good |
| Direct console entry (IP whitelist) | Yes | Yes | Yes | No, needs a bridge |
| Many regions and frequent IP variety | Workable | Good | Good | Best |
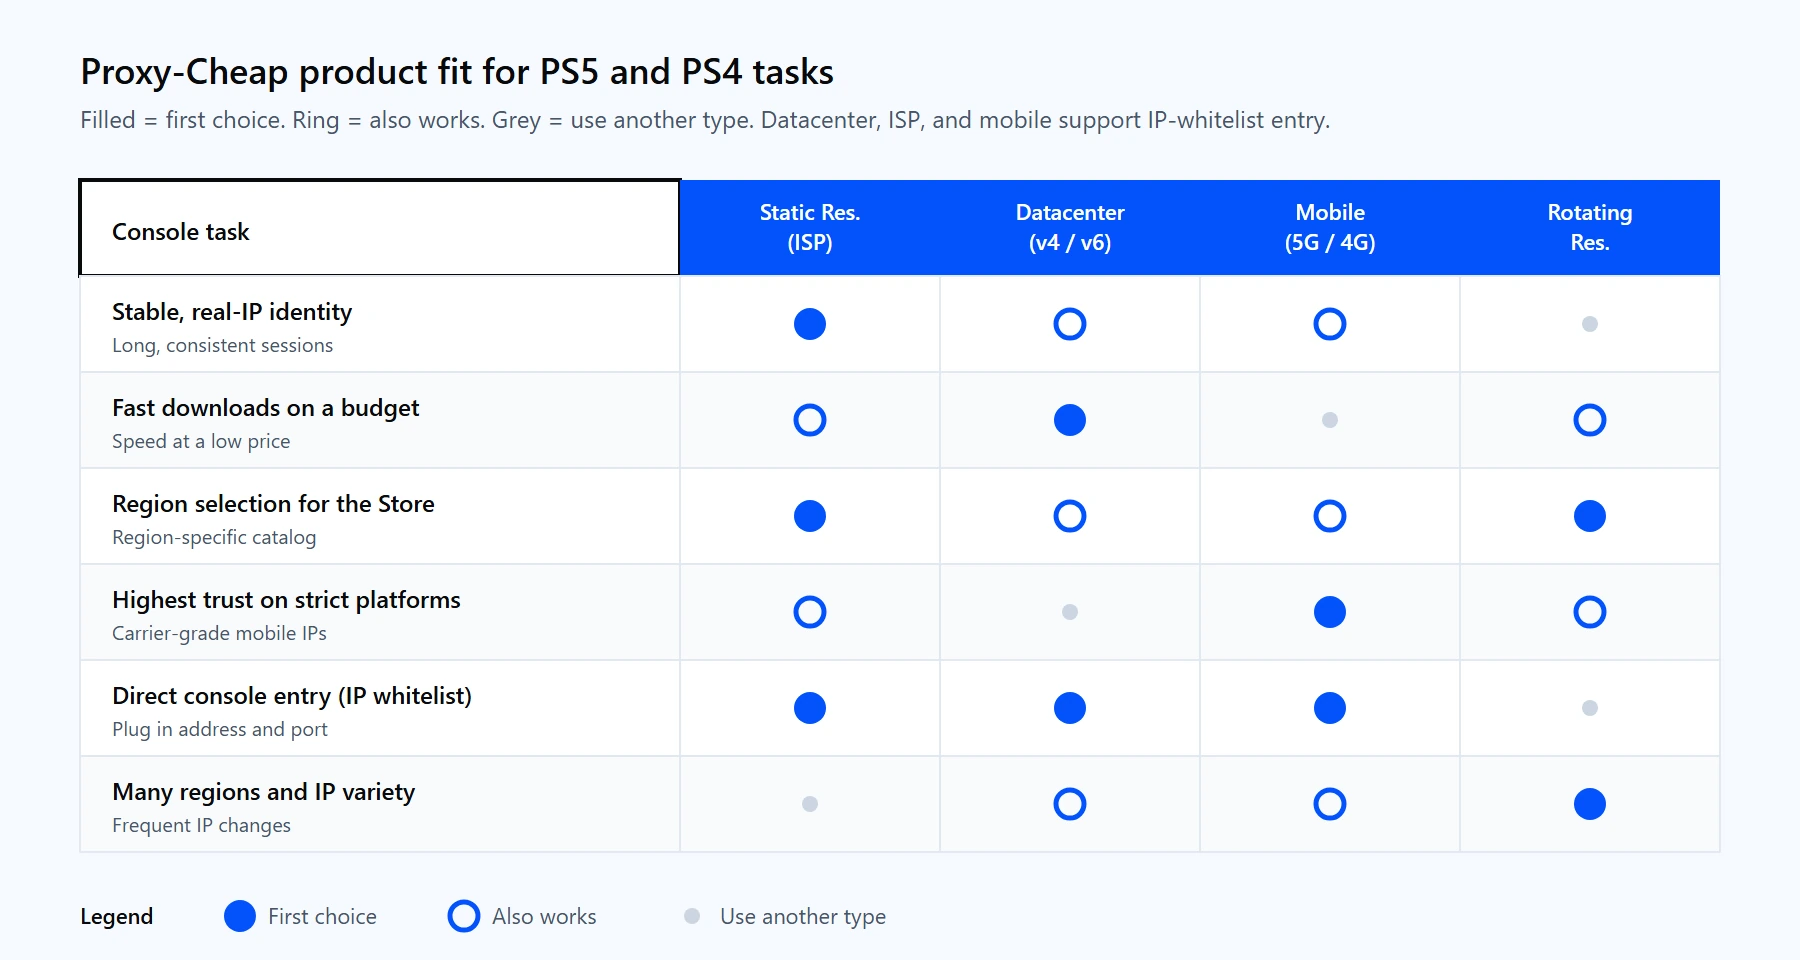
Match the Proxy-Cheap product to the task. The datacenter, ISP, and mobile lines support IP-whitelist authentication for direct console entry.
For most PS5 and PS4 setups, a static residential or datacenter IP with whitelisting is the quickest route to a working connection, with mobile in reserve for the strictest platforms. You can compare the lines and start with pay-as-you-go pricing on the Proxy-Cheap ISP proxies page, then authorize your IP and follow the setup steps above.