Key takeaways:
Helium Scraper is a desktop web scraping application for Windows. You point and click at the data you want on a page, and it builds a structured table you can export, all without writing code. Under the hood it runs several off-screen Chromium browsers, so it renders JavaScript-heavy pages the same way a real browser does.
The tool has been around for years and is on its version 3 line, with updates shipping into 2026. It is built around an "association engine" that lets you capture nested, multi-level relationships (for example, every product inside every category inside every page), and it stores results in a local SQLite database that can grow to very large sizes. For users who want more control, Helium Scraper also accepts custom JavaScript actions and SQL queries over the data you collect.
In short, it sits between a pure no-code clicker and a full programming framework. Beginners can run a project in minutes, and power users can script edge cases when a site needs them.
Helium Scraper is used wherever someone needs structured data off the public web without building a scraper from scratch. Common projects include:
Because it is a Windows desktop app, teams often run it on a dedicated Windows machine or server so long jobs can run unattended. The point-and-click model makes it popular with analysts and operators who are comfortable with data but do not want to maintain code.
The capabilities that matter most for a production scrape:
Helium Scraper is not free, but it uses a one-time license rather than a subscription. The site states it plainly: pay once and use it for a lifetime, with no monthly payments. There is a fully functional 10-day trial you can download without a credit card, which is enough to validate a real project before you buy.
License tiers, verified on the official buy page at the time of writing:
| Tier | Price (one-time) | Users | Major upgrades included |
|---|---|---|---|
| Basic | $99 | 1 | 3 months |
| Professional | $199 | 2 | 6 months |
| Business | $399 | 5 | 12 months |
| Enterprise | $699 | 10 | 24 months |
Every tier includes unlimited minor updates. The difference between tiers is the number of users, the length of premium support, and how long you keep receiving major version upgrades. Pricing changes from time to time, so confirm the current figures on the buy page before you purchase.
Installation is a standard Windows setup.
Helium Scraper runs on Windows only (Windows 10 or 11, or a Windows Server instance). There is no native macOS or Linux build, so Mac and Linux users typically run it inside a Windows virtual machine or on a small Windows server. Running it on a server is also the cleanest way to keep long, scheduled scrapes going without tying up your main computer.
The fastest path from install to data:
That is the whole loop for a simple site. Pagination, detail-page navigation, and nested data are handled by adding actions and using the association engine, which is where the tool's depth shows.
Helium Scraper stores everything it collects in a local SQLite database, then lets you export to whatever format your downstream workflow expects.
| Format | Best for |
|---|---|
| CSV | Quick handoff to spreadsheets and most data tools |
| Excel (XLSX) | Sharing formatted results with non-technical reviewers |
| JSON | Feeding APIs, scripts, and data pipelines |
| XML | Legacy systems and structured document workflows |
| SQLite | Large datasets and querying with SQL before export |
The SQLite layer is the part people underuse. Because the data already lives in a relational database, you can run SQL to clean, join, and filter results before you export a single row. For big jobs, that is faster than exporting everything and cleaning it later.
A direct connection from your own IP is fine for a few pages. It stops being fine the moment you scale to a real workload, which is why serious scraping runs through a residential proxy network. For a broader view of what to look for, the best proxies for web scraping guide covers selection criteria across the industry.
Three concrete reasons to put a proxy in front of every Helium Scraper project:
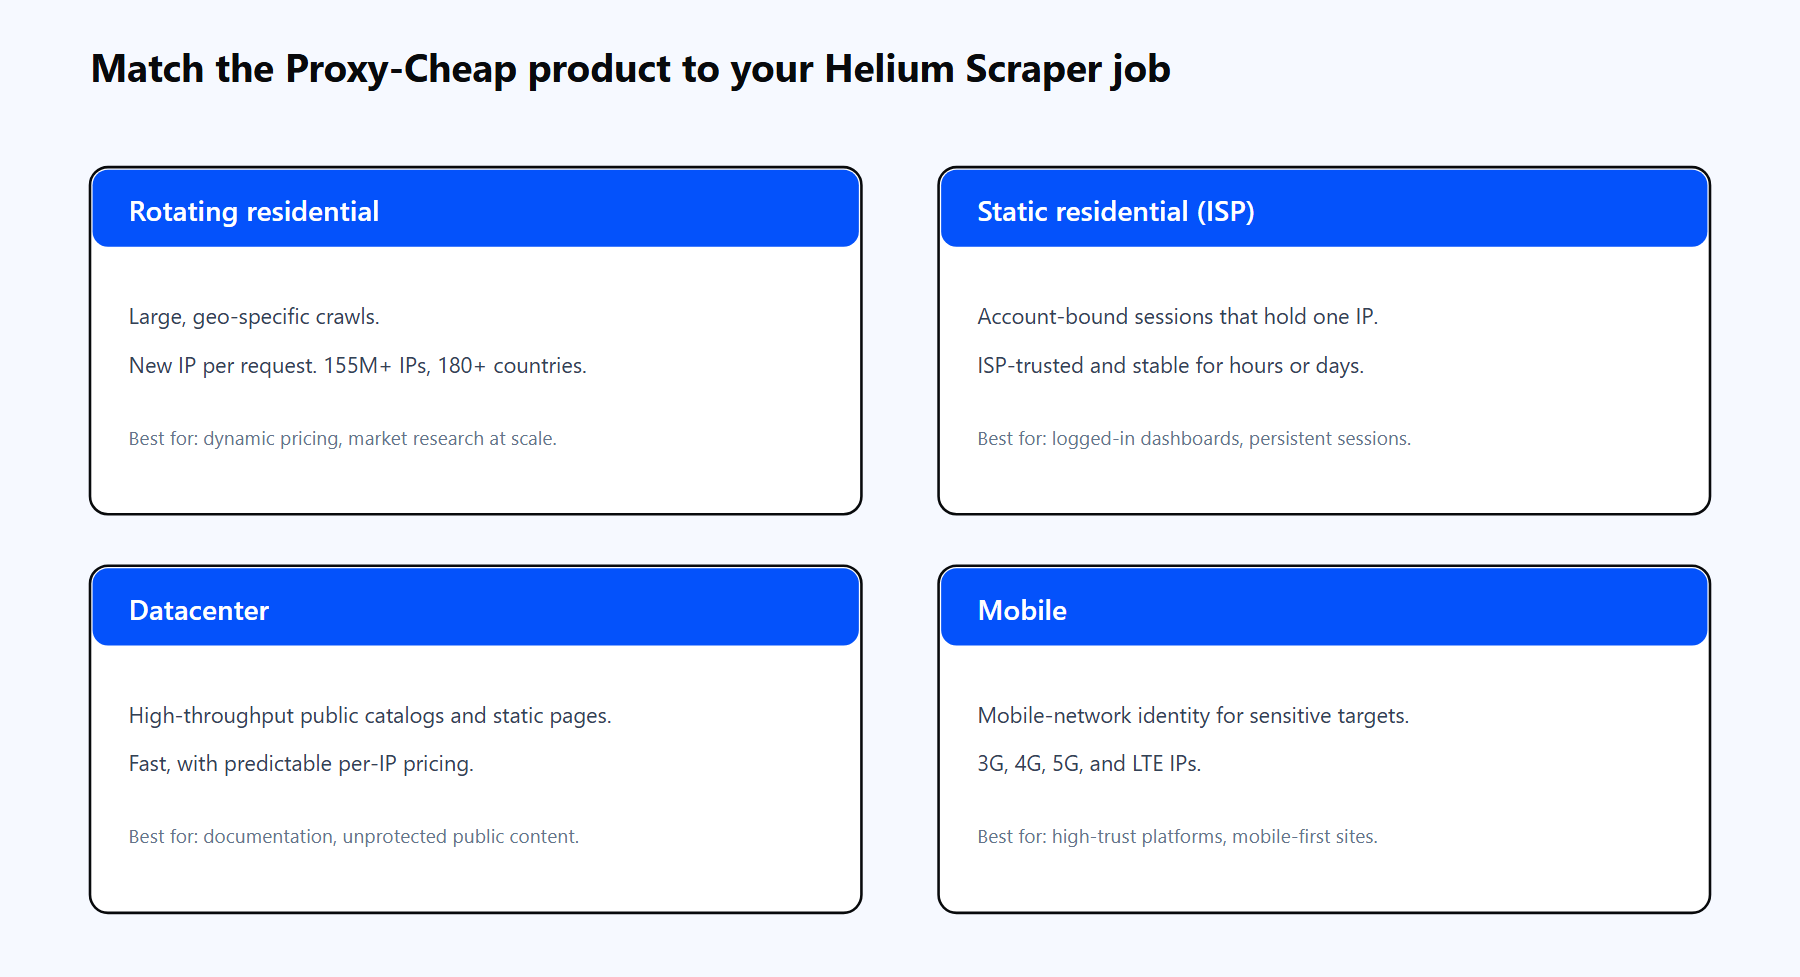
Each Proxy-Cheap product line is optimized for a different shape of workload. The links below match the cards above.
Proxy-Cheap offers four product lines that map cleanly onto Helium Scraper's typical jobs:
For mobile-network identity on the most sensitive targets, mobile proxies are the fit. For most Helium Scraper projects, the choice is one of the four above, picked by the shape of the target site rather than the size of the budget.
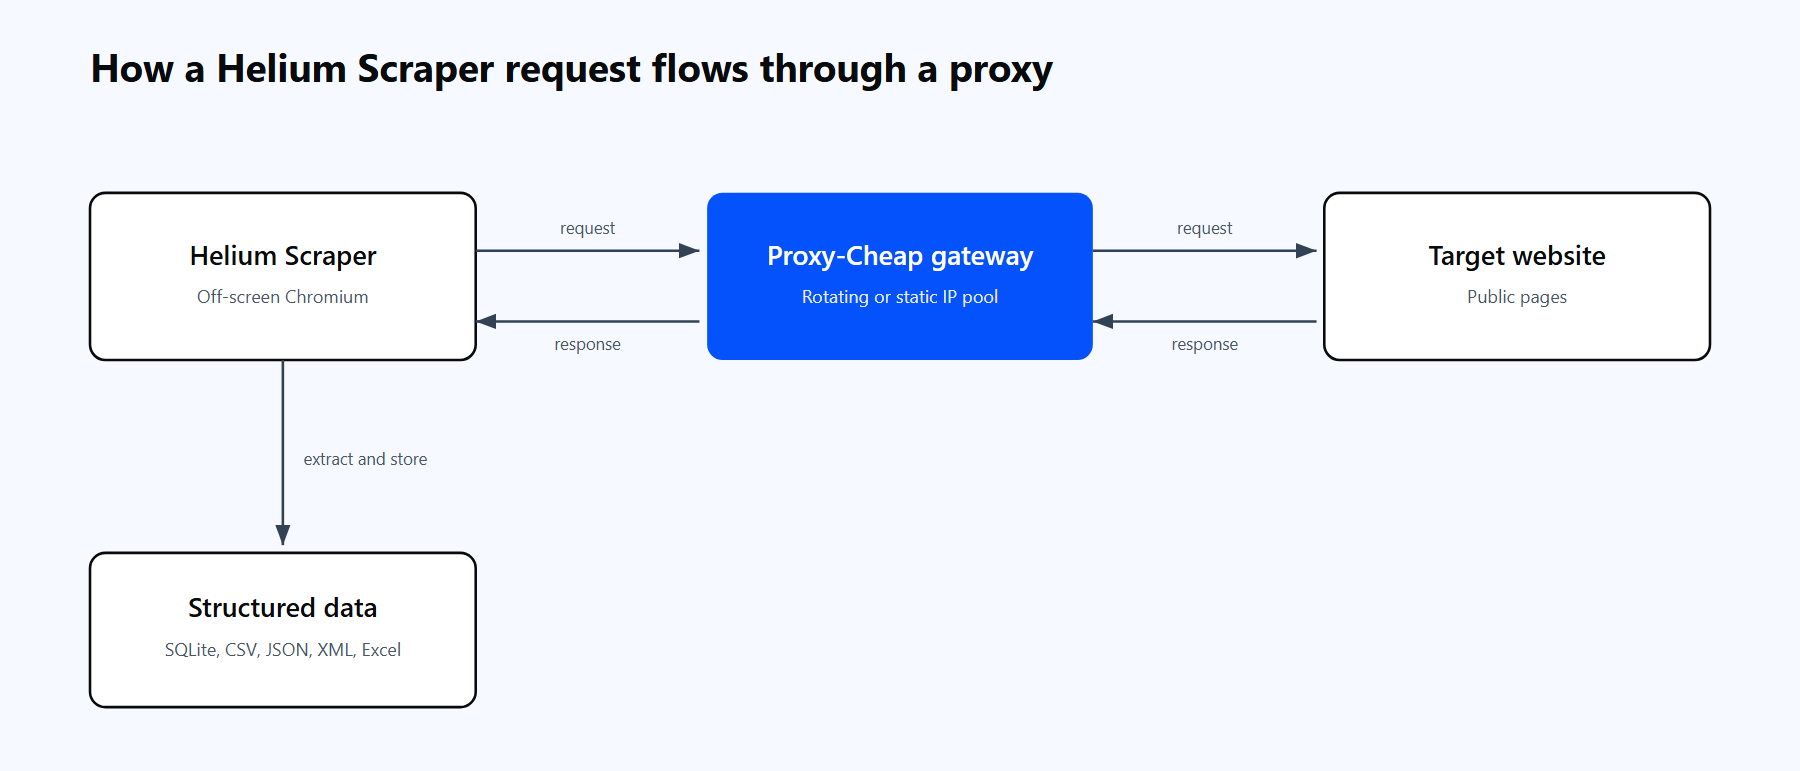
A Helium Scraper project routes its off-screen Chromium requests through the Proxy-Cheap gateway, fetches the target site through a pool IP, and stores the result as structured rows.
Helium Scraper manages proxies in two places: a global proxy list, and a per-project switch that turns proxies on. You set both.
Step 1: Add your proxies. Open the File menu and choose Proxy List. Each proxy needs four fields:
Address:   the proxy host (no scheme, no credentials)
Port:      the proxy port
Username:  your proxy username (leave blank for IP whitelist)
Password: your proxy password (leave blank for IP whitelist)A quick note on Proxy-Cheap endpoint formats, because they differ by product:
Before you paste anything into Helium Scraper, it is worth confirming the string is valid. A one-line curl test proves the host, port, and credentials are shaped correctly:
# Prints the exit IP if the proxy works. A 407 means the credentials were rejected.
# Swap in your real Proxy-Cheap username and password.
curl -x http://thehub.proxy-cheap.com:8080 -U "<your-proxycheap-username>:<your-proxycheap-password>" “https://api.ipify.org?format=json”If the returned IP is not yours, the proxy works. A 407 means the gateway answered but the credentials were rejected, so re-check the username and password. A "could not resolve" error means the host is wrong.
Step 2: Enable proxies for the project. Open Project, then Settings, find Enable Proxies, and set it to True, then click OK. This switch is per project, so repeat it for every new project you create. Proxies added to the list but never enabled on the project is the single most common reason a setup "does nothing."
Step 3: Verify inside Helium Scraper. Point a quick project at a page that echoes your IP and run it. If the captured IP belongs to the proxy pool rather than your own connection, the integration is live.
A few practical notes:
You get rotation in two different ways, depending on which Proxy-Cheap product you use.
Rotation at the gateway (rotating residential). The gateway does the work. Add one line for thehub.proxy-cheap.com:8080 and every request automatically exits from a new IP. You do not need a long list, and you can leave Helium Scraper's interval alone because the rotation happens upstream.
Rotation across a static list (residential, ISP, or datacenter). Each proxy is a fixed IP, so you add several lines to the Proxy List and let Helium Scraper cycle through them. This is controlled by the Proxy Rotation Interval in Project then Settings:
Which approach to choose comes down to the workload, and the static vs rotating proxies comparison breaks it down in detail:
Helium Scraper projects are built from actions, and two of them give you script-level control over proxies. Both are useful when a timer-based interval is too blunt for the site you are scraping.
RotateProxy advances to the next working proxy in your list on demand. It needs two conditions: proxies enabled in project settings, and the Proxy Rotation Interval set to 0 so the timer is not also rotating behind your back.
# Project settings: Enable Proxies = True, Proxy Rotation Interval = 0
# Then call RotateProxy from your project flow, for example after every
# N records or whenever a page returns an error.
Action.RotateProxyThis is the pattern to use when you want a new IP at specific moments (after each category page, or after a failed load) rather than on a fixed clock.
SetProxy sets a specific proxy on all browsers, which is handy when you want to pin a project to one IP or choose a proxy by your own logic. The signature takes the proxy details directly:
# Disable proxies in project settings when you drive them with SetProxy.
Browser.SetProxy address port username password

# Example shape (use your real host, port, and credentials):
Browser.SetProxy "thehub.proxy-cheap.com" "8080" "<your-proxycheap-username>" "<your-proxycheap-password>"One rule to remember: a project that uses SetProxy should turn off the Enable Proxies switch in project settings, because SetProxy is taking over that job. Mixing the two is a common source of confusion. Use the project-level list and interval for simple rotation, RotateProxy for event-driven rotation, and SetProxy when you need to assign an exact proxy yourself.
Most proxy problems in Helium Scraper come from a handful of predictable causes.
1. Proxies are in the list but nothing routes through them. The per-project switch is off. Open Project then Settings, set Enable Proxies to True, and click OK. Remember this is per project, so a brand-new project starts with proxies disabled again.
2. RotateProxy does nothing. Two prerequisites are missing. Proxies must be enabled in project settings, and the Proxy Rotation Interval must be set to 0. With a non-zero interval, the timer controls rotation and the action has nothing to do.
3. SetProxy seems to be ignored. The project-level proxy switch is fighting it. When a project uses SetProxy, disable Enable Proxies in project settings so SetProxy is the only thing assigning proxies.
4. Authentication failures (407 or repeated login prompts). The credentials are in the wrong place or are wrong. Put the host in Address only, and the username and password in their own fields, with no scheme or credentials baked into the host. Confirm with the curl test above: a 407 means the gateway is reachable and you only need to fix the credentials.
5. Connection errors or dead IPs on a static list. Individual static IPs can go quiet. Prune the proxies that consistently fail, keep the list fresh, or switch to the rotating residential gateway so a working IP is drawn for you on every request.
6. The right data but from the wrong country. The exit IP is not in your target market. Use Proxy-Cheap country or city targeting so the IP matches the location whose prices or listings you need.
7. Scrapes slow down through the proxy. Routing adds latency, and too many parallel browsers on residential IPs can compound it. Tune the rotation interval, reduce the number of concurrent browsers, and use datacenter proxies for high-throughput public targets where raw speed matters more than residential trust.
For no-code and low-code scraping on Windows, Helium Scraper is a strong, mature choice. The point-and-click model gets non-programmers to real data quickly, the off-screen Chromium engine handles modern JavaScript sites, and the one-time license is a genuine cost advantage over the subscription tools it competes with. A few honest tradeoffs are worth weighing.
Pros
Cons
The middle ground for most teams: run Helium Scraper on a Windows machine, pair it with a value-tier proxy provider on pay-as-you-go billing, and you cover the large majority of scraping projects without enterprise-tier overhead.
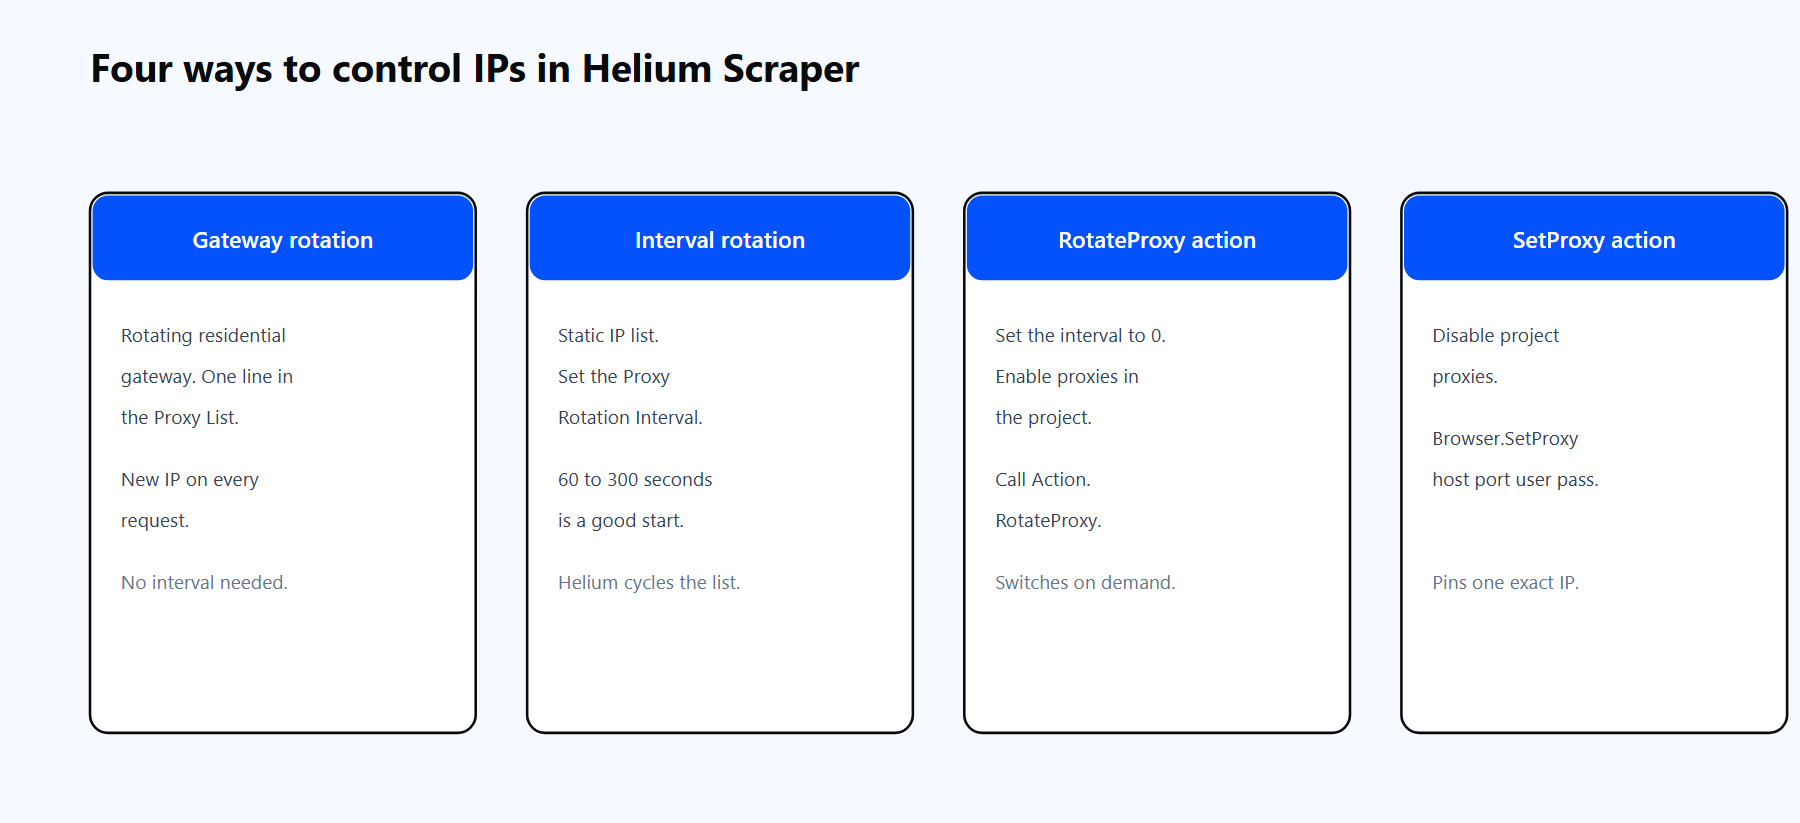
Four ways to control IPs in Helium Scraper, from automatic gateway rotation to fully scripted proxy assignment.