Key takeaways:
- On desktop, Chrome uses your operating system's proxy settings, so you change a Chrome proxy in Windows, macOS, or ChromeOS network settings.
- On Android and iPhone, Chrome follows the Wi-Fi network's proxy, which you set on the active network.
- A Chrome extension lets you run a proxy in Chrome only, separate from the rest of your computer, and switch between proxies per site.
- The Chrome address field accepts HTTP and HTTPS proxies. For SOCKS5, use the --proxy-server launch flag or an extension that supports it.
Chrome does not keep a proxy panel of its own on the desktop. It opens your operating system settings and follows whatever proxy is set there for every app. That means there are several ways to point Chrome at a proxy, depending on whether you want it system-wide, in Chrome only, or for specific sites. This guide covers each method on every device.
Where Chrome's proxy settings live
Knowing where the setting lives saves time:
- Desktop (Windows, macOS, ChromeOS): Chrome uses the operating system proxy. Its in-browser shortcut opens that panel.
- Android and iPhone: Chrome uses the proxy set on the connected Wi-Fi network.
- Any platform: a proxy extension can override the above and apply a proxy to Chrome alone.
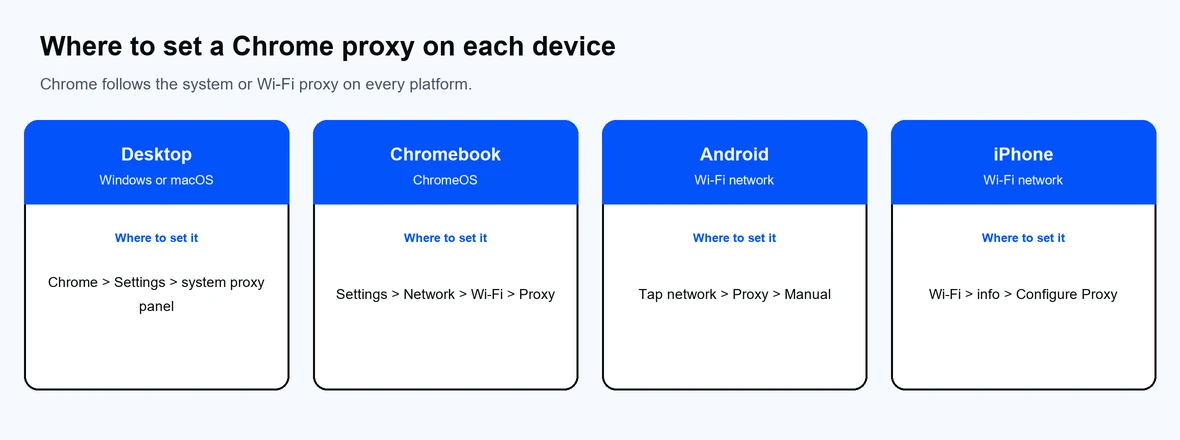
Chrome follows the system or Wi-Fi proxy on every platform.
How to change Chrome proxy settings on desktop (Windows and macOS)
- Open Chrome, click the three-dot menu, and choose Settings.
- Search proxy in the settings search bar, then click Open your computer's proxy settings.
- On Windows: under Manual proxy setup, turn on Use a proxy server, enter the host and port, then select Save. For the full Windows walkthrough, see our guide on how to set up a proxy in Windows.
- On macOS: select your active connection, open Details > Proxies, check the protocol you need (Web Proxy or Secure Web Proxy), enter the host and port, add credentials if required, then select OK and Apply.
- Restart Chrome so the change applies.
You can jump straight to the shortcut by typing chrome://settings/system in the address bar and selecting Open your computer's proxy settings.
How to change Chrome proxy settings on a Chromebook
ChromeOS keeps a proxy setting per network, so you change it on the Wi-Fi connection you use.
- Open Settings > Network and select your active Wi-Fi network.
- Expand the Proxy section.
- Set the connection type to Manual proxy configuration.
- Enter the host and port for each protocol you need, then save.
Because the setting is tied to the network, a proxy you add on one Wi-Fi network does not carry over to another.
How to set a proxy in Chrome on Android and iPhone
Chrome on mobile uses the Wi-Fi network's proxy rather than a setting inside the app.
Android:
- Open Settings > Network & internet > Wi-Fi and tap the connected network.
- Open Advanced or Proxy options.
- Choose Manual, enter the host and port, then save.
iPhone and iPad:
- Open Settings > Wi-Fi and tap the i next to your network.
- Tap Configure Proxy and choose Manual.
- Enter the server, port, and any authentication, then tap Save.
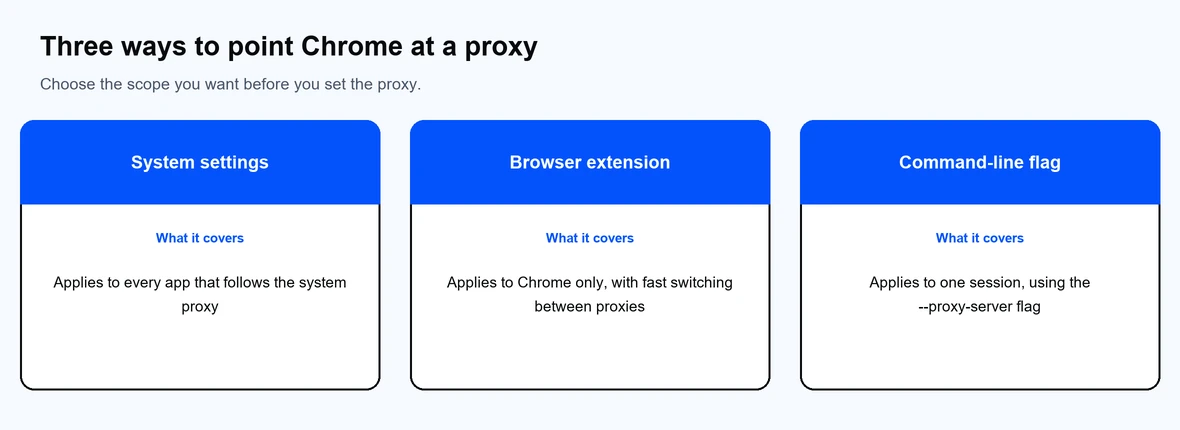
Pick the scope first: every app, Chrome only, or a single session.
How to use a proxy for specific sites in Chrome
If you want a proxy on some sites but a direct connection on others, you have three options:
- Exceptions list: in the system proxy panel, add the sites that should skip the proxy, separated by semicolons (for example *.example.com).
- A PAC file: point Chrome's automatic script setting to a .pac file that defines per-site rules. This is common in organizations.
- A proxy extension: tools that let you build per-URL rules give you the most control inside Chrome.
How to change Chrome's proxy with an extension
A proxy extension applies a proxy to Chrome only, without touching system settings, and makes switching fast.
- Install a proxy manager from the Chrome Web Store, or use the Chrome proxy extension.
- Open the extension and add a new proxy profile.
- Enter the host, port, protocol, and any username and password.
- Select the profile to activate it, and switch profiles whenever you need a different proxy.
Extensions are useful when you manage several proxies or want a proxy in Chrome but not in other apps.
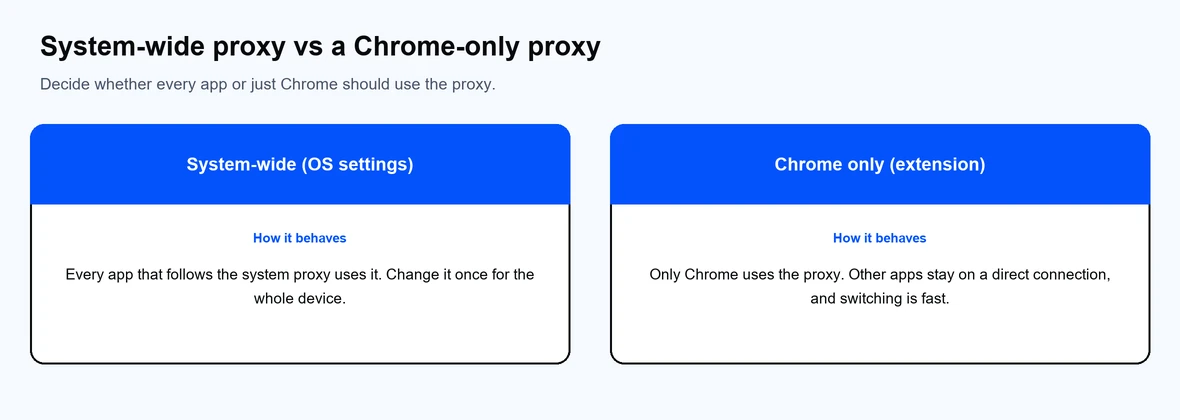
A system proxy covers every app; an extension keeps it to Chrome.
How to set a proxy with the Chrome command line
For a single session, launch Chrome with the --proxy-server flag. This applies the proxy to that window only and does not change your system settings.
# HTTP proxy
chrome.exe --proxy-server="http://host:port"
# SOCKS5 proxy
chrome.exe --proxy-server="socks5://host:port"
On macOS use open -a "Google Chrome" --args --proxy-server="http://host:port", and on Linux use google-chrome --proxy-server="http://host:port". Decide between SOCKS5 or HTTP based on the traffic you route.
How to check your Chrome proxy settings
Confirm the proxy is applied before relying on it:
- Type chrome://net-internals/#proxy in the address bar to see the effective proxy configuration.
- Load any "what is my IP" page and confirm the IP and location match the proxy.
- Keep your proxy server address on hand so you can confirm Chrome is using the right one.
If you ever need to turn it off, follow our steps to remove a proxy in Chrome.
Which proxy works best with Chrome
The setting only matters if the proxy behind it is reliable. Free public proxies often drop connections and raise privacy concerns, so a paid service is the steadier choice. Match the type to your task:
- [Residential proxies](https://www.proxy-cheap.com/services/residential-proxies) for high-trust targets and location-accurate browsing.
- [Datacenter proxies](https://www.proxy-cheap.com/services/datacenter-proxies) for fast access to public content.
- [ISP proxies](https://www.proxy-cheap.com/services/isp-proxies) for long, stable sessions.
Proxy-Cheap offers these on pay-as-you-go and per-IP plans with no monthly commitment. For a full comparison, see our roundup of the best proxy providers.