
Key takeaways
Ubuntu does not have one master proxy setting. The desktop, the shell, the package managers, and individual command-line tools each keep their own proxy config, which is why a proxy that works in Firefox can still leave apt and curl connecting directly. This guide walks through every layer, in the order most setups need them, and shows how to point each one at a Proxy-Cheap gateway.
What does proxy integration with Ubuntu mean?
Proxy integration with Ubuntu means routing the network traffic of the system and its programs through a proxy server instead of sending it straight out from your machine. The proxy receives each request, forwards it to the target site through its own IP, and returns the response. On Ubuntu you do this in several independent places rather than one control panel.
The steps below target Ubuntu 24.04 LTS (Noble Numbat), the current long-term-support release. Ubuntu 22.04 LTS (Jammy Jellyfish) uses the same files, variables, and commands, so everything here applies to both. Confirm your release with lsb_release -a.
There are two broad ways in, and most real setups use both:
Why route Ubuntu traffic through a proxy?
A direct connection from one IP is fine for a handful of requests. It stops being enough as soon as you script real volume, pull data from several regions, or run jobs from a shared server. Most production work on Ubuntu runs through a rotating residential proxy network for three reasons.
The rest of this guide assumes you have a proxy host, port, username, and password ready, and shows where each one goes on Ubuntu.
Where Ubuntu reads proxy settings: the config layers
The single most useful thing to understand about Ubuntu is that there is no shared proxy state. Each layer reads its own config and ignores the others. Set the proxy in the layer whose tools you actually use, or in several layers if you need broad coverage.
| Config layer | What it controls | Takes a username and password? |
|---|---|---|
| GNOME Network Proxy (gsettings) | GNOME and GTK desktop apps, including the Settings browser | Yes, on the HTTP schema |
| Shell variables and /etc/environment | curl, wget, git, pip, and most CLI tools | Yes, in the proxy URL |
| apt.conf.d drop-in | apt, apt-get, and aptitude only | Yes, in the proxy URL |
| snap set system proxy | snapd and every snap install | Yes, in the proxy URL |
| curl and wget flags or rc files | that one tool | Yes, via flags or the URL |
| proxychains4 | any single command you prefix with it | Yes, in the [ProxyList] entry |
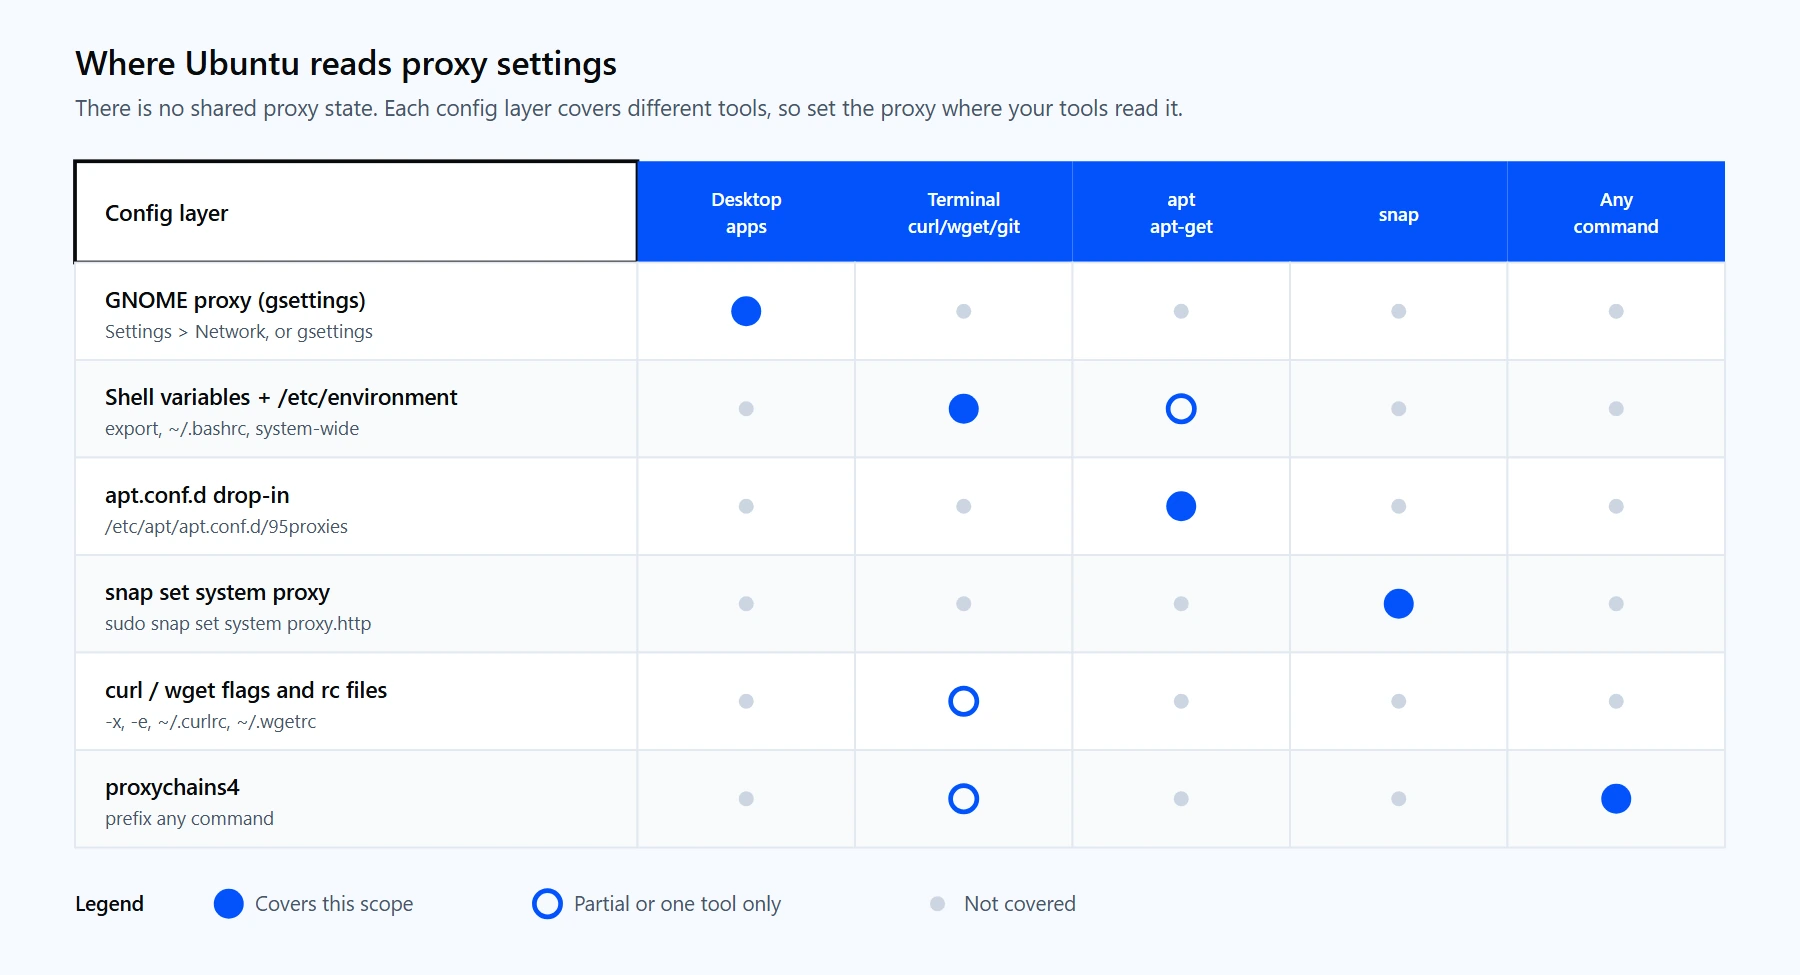
Each Ubuntu layer reads its own proxy config. A setting in one layer does not reach the others, so match the layer to the tools you run.
Two protocols cover almost everything. An HTTP proxy handles plain http:// traffic and tunnels https:// traffic with the CONNECT method, which makes it the most compatible choice across Ubuntu tools. A SOCKS5 proxy forwards any TCP connection at a lower level, and with the socks5h:// scheme it resolves the target hostname at the proxy rather than on your machine. For a fuller comparison of when each fits, see SOCKS and HTTP proxies compared.
How to set a proxy in Ubuntu desktop settings (GNOME)
On Ubuntu Desktop, open Settings, go to Network, and select Network Proxy. Switch it to Manual and fill in the host and port for HTTP, HTTPS, and, if you have one, SOCKS. This covers GNOME and GTK apps that ask the desktop for a proxy. It does not touch the terminal, curl, wget, apt, or snap, which is the source of a common surprise covered later.
For a headless or scripted desktop, set the same values with gsettings on the org.gnome.system.proxy schema:
# Turn on manual proxy mode
gsettings set org.gnome.system.proxy mode 'manual'
# HTTP proxy host and port
gsettings set org.gnome.system.proxy.http host 'proxy.example.com'
gsettings set org.gnome.system.proxy.http port 3128
# Username and password (available on the HTTP schema)
gsettings set org.gnome.system.proxy.http use-authentication true
gsettings set org.gnome.system.proxy.http authentication-user 'user'
gsettings set org.gnome.system.proxy.http authentication-password 'pass'
# Apply the same proxy to every protocol
gsettings set org.gnome.system.proxy use-same-proxy true
# Hosts to reach directly, GNOME's version of no_proxy
gsettings set org.gnome.system.proxy ignore-hosts "['localhost', '127.0.0.0/8', '::1']"
These are per-user settings stored in dconf, so they do not carry over to root, cron jobs, or non-graphical SSH sessions. Confirm the state with gsettings get org.gnome.system.proxy mode, and set the mode back to 'none' to turn the desktop proxy off.
How to set proxy environment variables in Ubuntu
The terminal is where most proxy work happens, and it runs on environment variables. Start with a temporary setup that lasts only for the current shell. This is the safest way to test credentials before you persist anything.
# Set the proxy for the current shell session (lowercase is the primary form)
export http_proxy="http://<your-proxycheap-username>:<your-proxycheap-password>@thehub.proxy-cheap.com:8080"
export https_proxy="$http_proxy"
export no_proxy="localhost,127.0.0.1,::1,.internal.example.com"
# Also set the uppercase names, since some tools only read those
export HTTP_PROXY="$http_proxy"; export HTTPS_PROXY="$https_proxy"; export NO_PROXY="$no_proxy"
# Confirm what is set
env | grep -i _proxy
To persist the values per user, append the same export lines to ~/.bashrc (or ~/.zshrc) and reload with source ~/.bashrc. To persist them for every user and service, add them to /etc/environment. That file is not a shell script, so use plain KEY=value lines with no export keyword, and the change takes effect on the next login:
# /etc/environment (one KEY=value per line, no export, no $VAR expansion)
http_proxy="http://<your-proxycheap-username>:<your-proxycheap-password>@thehub.proxy-cheap.com:8080"
https_proxy="http://<your-proxycheap-username>:<your-proxycheap-password>@thehub.proxy-cheap.com:8080"
no_proxy="localhost,127.0.0.1,::1"
HTTP_PROXY="http://<your-proxycheap-username>:<your-proxycheap-password>@thehub.proxy-cheap.com:8080"
HTTPS_PROXY="http://<your-proxycheap-username>:<your-proxycheap-password>@thehub.proxy-cheap.com:8080"
NO_PROXY="localhost,127.0.0.1,::1"
Two details save time later. The proxy URL scheme is usually http:// even when the target is an HTTPS site, because that scheme describes how you reach the proxy, not the target. And sudo drops these variables by default, so a proxy that works for your user can still leave sudo apt connecting directly. Both points come up again in the errors section.
How to set a proxy for apt and snap
Ubuntu's two package managers each ignore your shell variables and read their own config, so they need separate setup. This is deliberate: sudo apt runs with a clean environment, so tying apt to a config file is more reliable than depending on exported variables.
For apt, create a drop-in file under /etc/apt/apt.conf.d/. A higher number wins if several files set a proxy, and the trailing semicolon is required:
# /etc/apt/apt.conf.d/95proxies (write with sudo)
Acquire::http::Proxy "http://<your-proxycheap-username>:<your-proxycheap-password>@thehub.proxy-cheap.com:8080";
Acquire::https::Proxy "http://<your-proxycheap-username>:<your-proxycheap-password>@thehub.proxy-cheap.com:8080";
Confirm apt picked it up with apt-config dump | grep -i proxy, then test end to end with sudo apt update. To send one host straight to its origin while keeping the global proxy, give that host the special value DIRECT with Acquire::http::Proxy::mirror.example.com "DIRECT";. To turn the proxy off, delete or comment the file.
snapd is a background service that also ignores shell variables, so snap install fails behind a proxy until you tell snapd directly:
sudo snap set system proxy.http="http://<your-proxycheap-username>:<your-proxycheap-password>@thehub.proxy-cheap.com:8080"
sudo snap set system proxy.https="http://<your-proxycheap-username>:<your-proxycheap-password>@thehub.proxy-cheap.com:8080"
# Check and clear
snap get system proxy
sudo snap unset system proxy.http; sudo snap unset system proxy.https
How to use a proxy with curl and wget
curl and wget both read http_proxy and https_proxy automatically, so once the variables above are exported a plain curl https://example.com or wget https://example.com/file.zip already routes through the proxy. When you want one command to use the proxy without changing the whole session, pass it inline.
curl is the workhorse, and it is also the fastest way to confirm the proxy is in the path. The complete guide to using cURL with a proxy goes further, but these commands cover the essentials:
# 1. HTTP proxy for one request, credentials in a separate flag
curl -x http://thehub.proxy-cheap.com:8080 \
-U "<your-proxycheap-username>:<your-proxycheap-password>" \
https://ifconfig.me
# 2. SOCKS5 with remote DNS (socks5h resolves the hostname at the proxy)
curl -x socks5h://thehub.proxy-cheap.com:8080 \
-U "<your-proxycheap-username>:<your-proxycheap-password>" \
https://ifconfig.me
# 3. Send one host straight to its origin, proxy everything else
curl --noproxy "internal.example.com" https://ifconfig.me
https://ifconfig.me echoes the outbound IP back to you, so running it with and without the proxy is the quickest proof that traffic is actually egressing through the proxy. Prefer -U (or --proxy-user) over putting credentials in the URL, because curl keeps them out of URL parsing and avoids errors when a password contains characters like @, :, or #. To make the setting permanent for curl alone, add proxy = http://thehub.proxy-cheap.com:8080 and proxy-user = user:pass to ~/.curlrc.
wget covers downloads. It reads the same variables, and you can also pass settings inline with -e. The using wget with a proxy guide has the full reference:
# Inline for a single download
wget -e use_proxy=on \
-e http_proxy=http://<your-proxycheap-username>:<your-proxycheap-password>@thehub.proxy-cheap.com:8080 \
https://example.com/file.zip
# Credentials in separate flags instead of the URL
wget --proxy-user="<your-proxycheap-username>" \
--proxy-password="<your-proxycheap-password>" \
-e use_proxy=on -e http_proxy=http://thehub.proxy-cheap.com:8080 \
https://example.com/file.zip
For repeated jobs, set the values once in ~/.wgetrc (or /etc/wgetrc for all users) with use_proxy = on. One thing to remember: wget does not speak SOCKS at all, so a socks5h:// proxy that works in curl will never work in wget. For SOCKS with wget, route it through proxychains, covered next.
Forcing any command through a proxy with proxychains
Some tools ignore proxy variables completely. proxychains4 (the proxychains-ng package) tunnels any command's TCP traffic through a proxy, which is the reliable fallback for programs with no proxy setting of their own. Install it, edit the config, then prefix any command:
sudo apt update && sudo apt install -y proxychains4
# In /etc/proxychains4.conf, keep the DNS request on the proxy to avoid local lookups
proxy_dns
# Choose one chain mode (leave the default strict_chain, or use dynamic_chain to skip dead proxies)
# In the [ProxyList] section, add one entry: type host port user pass
[ProxyList]
http proxy-us.proxy-cheap.com 5959 <your-proxycheap-username> <your-proxycheap-password>
# socks5 proxy-us.proxy-cheap.com 5959 <your-proxycheap-username> <your-proxycheap-password>
# Run any command through the chain and confirm the exit IP
proxychains4 curl -s https://ifconfig.me; echo
proxychains4 wget -qO- https://ifconfig.me
The proxy_dns line is proxychains' equivalent of socks5h: it sends DNS lookups through the proxy instead of resolving them locally. On Ubuntu the binary and config are named proxychains4, and a proxychains symlink usually points to it.
How to set up Proxy-Cheap proxies on Ubuntu
Everything above uses placeholder credentials. Here is where the real values come from and how a request actually travels.
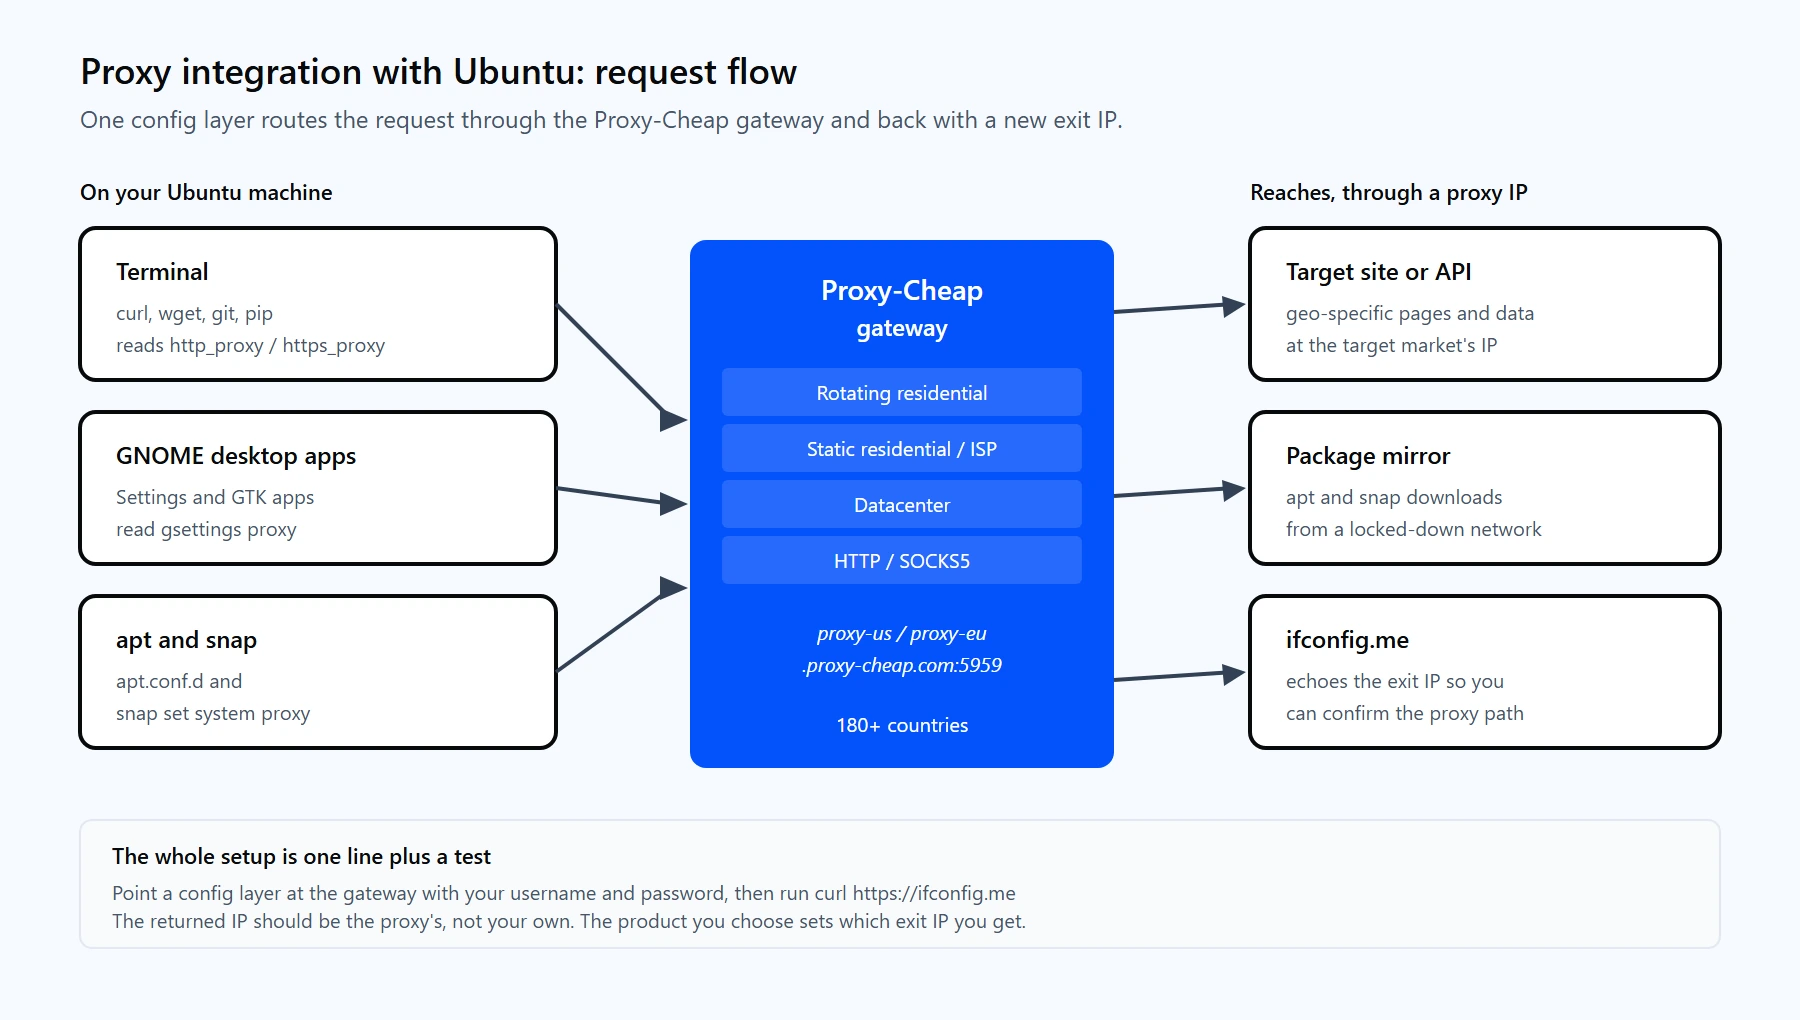
One environment variable, apt line, or curl flag routes the request through the Proxy-Cheap gateway and back. The product you choose sets the exit IP.
Proxy-Cheap delivers credentials in standard host:port plus username:password form, generated in the dashboard's Setup Credentials panel. The endpoint format differs by product, and both drop straight into the commands above:
So a working rotating-residential setup on Ubuntu is one export line plus a test:
export http_proxy="http://<your-proxycheap-username>:<your-proxycheap-password>@thehub.proxy-cheap.com:8080"
export https_proxy="$http_proxy"
curl https://ifconfig.me # should print a Proxy-Cheap exit IP, not your own
Three details are worth setting up front:
How to rotate proxies on Ubuntu
Rotation works two ways, depending on the product:
This bash loop walks a list of static proxies across a batch of URLs, one IP after another:
#!/usr/bin/env bash
# Cycle a list of static proxies across many requests
proxies=(
"http://<your-proxycheap-username>:<your-proxycheap-password>@IP-ONE.proxy-cheap.com:PORT"
"http://<your-proxycheap-username>:<your-proxycheap-password>@IP-TWO.proxy-cheap.com:PORT"
)
i=0
while read -r url; do
p="${proxies[$((i % ${#proxies[@]}))]}"
curl -s -x "$p" "$url" -o "page-$i.html"
i=$((i + 1))
done < urls.txt
For heavier automation you usually graduate from a shell loop to code. The same idea in Python is covered in how to rotate proxies in Python. Choosing between the two products comes down to how long you need one IP to last, which static vs rotating proxies breaks down in full. Rotating residential is the default for high-volume, geo-spread jobs; static residential and ISP win when a workflow needs one consistent IP for hours or days.
Common errors and how to fix them
Most Ubuntu proxy failures fall into a handful of buckets.
1. `sudo apt` ignores your proxy. sudo runs with a sanitized environment and drops http_proxy and friends, so variables set in your user shell never reach the elevated command. Run sudo -E apt update to keep them for one command, or run sudo visudo and add Defaults env_keep += "http_proxy https_proxy no_proxy HTTP_PROXY HTTPS_PROXY NO_PROXY" to make it permanent. Better still, use the apt config file so apt does not depend on your shell at all.
2. apt still connects directly. apt does not reliably read shell variables. Put the proxy in /etc/apt/apt.conf.d/95proxies as shown above, then verify with apt-config dump | grep -i proxy. If the output is empty, apt is not seeing your file.
3. HTTPS requests fail while HTTP works. Either https_proxy is not set, or its value starts with https://. The proxy URL scheme names how you reach the proxy, which is almost always plain HTTP, so set https_proxy="http://..." with the same http:// value as http_proxy.
4. The desktop proxy does not reach the terminal. GNOME's proxy applies only to desktop apps that ask GLib for a proxy. curl, wget, apt, git, and pip never read it. Set the environment variables separately, or add them to /etc/environment for every session.
5. `407 Proxy Authentication Required`. The proxy got no credentials or mangled ones, usually because a password contains characters like @, :, or # that break the inline URL. URL-encode them (@ becomes %40, : becomes %3A, # becomes %23), or keep the password out of the URL with curl --proxy-user 'user:pass' in single quotes.
6. `no_proxy` is not honored. The list must be comma-separated with no spaces, and a leading dot (.example.com) is what matches subdomains. wget does not understand CIDR ranges, and curl only added CIDR support in 7.86, so list explicit hosts when in doubt. Check your version with curl --version.
7. SOCKS5 cannot resolve the host or uses the wrong region. Plain socks5:// resolves DNS on your machine before connecting. Switch the scheme to socks5h:// (or use curl --socks5-hostname) so the proxy performs the lookup. Remember that wget has no SOCKS support, so use curl or proxychains for SOCKS.
8. Some tools read the proxy and others do not. There is no universal standard for the variable name. curl and wget prefer lowercase http_proxy, while some tools read only HTTP_PROXY. Set both cases, and treat lowercase as the canonical one.
9. The proxy is gone from your shell but apt, git, and snap still use it. unset http_proxy only clears the current session. The value also lives in /etc/environment, /etc/apt/apt.conf.d/, ~/.gitconfig (http.proxy), snapd's system config, and ~/.wgetrc. Clear each source, then log out and back in so /etc/environment is re-read.
Which Proxy-Cheap proxy fits your Ubuntu workflow
The right product depends on the shape of the job, not the size of the budget. Match the workflow to the proxy type before you commit.
| Ubuntu workflow | First choice | Also works |
|---|---|---|
| Geo-specific data from curl or wget | Rotating residential | Static residential |
| High-volume downloads of public files | Datacenter | ISP |
| Session-bound CLI (logins, API dashboards) | Static residential | ISP |
| Trusted long-lived API sessions | ISP | Static residential |
| apt and snap on a locked-down network | Datacenter | ISP |
| CI runner from a fixed server IP (whitelist) | ISP | Static residential |
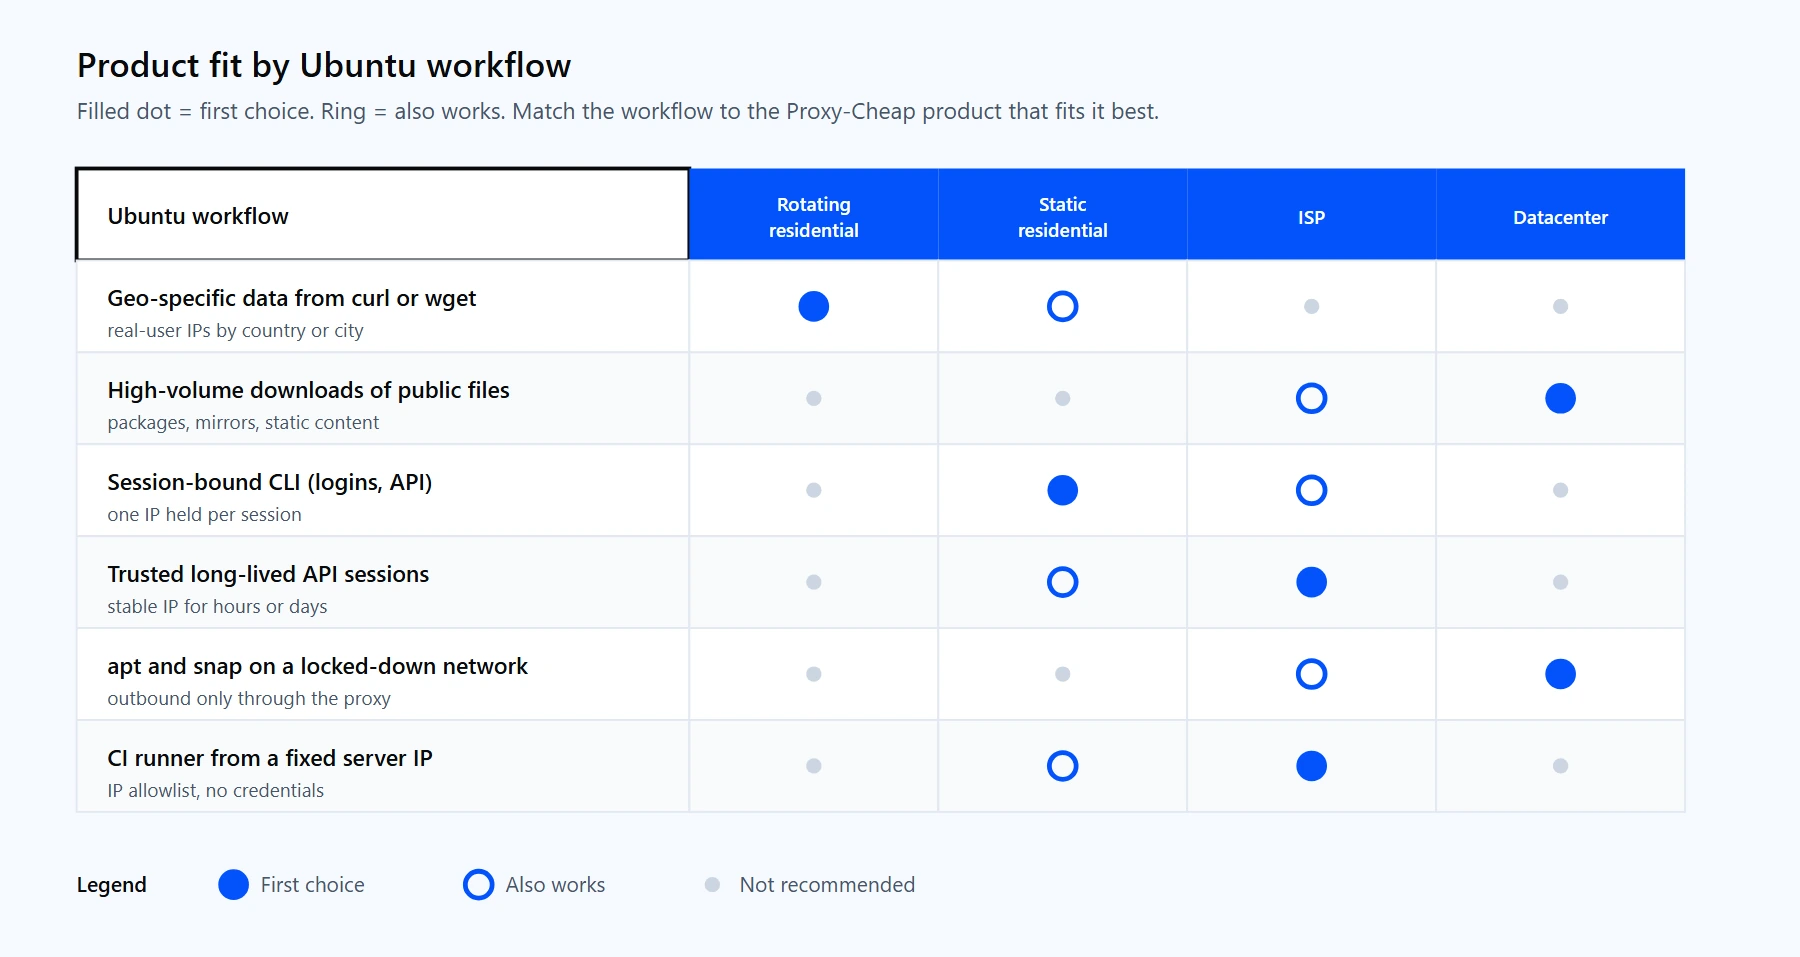
Pick the product by the shape of the workload: geo-specific data, high-throughput downloads, or session-bound command-line tools.
For high-throughput downloads of public files and package mirrors, datacenter proxies deliver predictable per-IP pricing and the speed a batch job needs. For trusted, long-lived sessions, ISP proxies pair datacenter speed with residential legitimacy. Whichever you pick, the Ubuntu setup is the same: one gateway line, your credentials, and a curl https://ifconfig.me to confirm the exit IP, all on pay-as-you-go pricing with no monthly commitment.