Microsoft Edge does not ship a proxy field of its own. Because it shares the system network stack, the proxy you set applies to Edge and to every other app that reads the same settings. This guide walks through each setup method on Windows and macOS, shows the command-line flags that scope a proxy to one Edge session, and ends with a troubleshooting checklist for the errors people hit most often.
Microsoft Edge proxy settings are the configuration that tells Edge to route its web traffic through an intermediary server instead of connecting to sites directly. A proxy server receives the request from Edge, forwards it to the target site, and returns the response, so the site sees the proxy's IP and location rather than your own.
Edge is a Chromium-based browser, and its network stack uses the system network settings by default. Two consequences follow. On Windows, the Edge proxy is the Windows proxy, so the option inside Edge simply opens the Windows page. And a system proxy applies to every app that reads it, not Edge alone, so a proxy scoped to Edge only needs the command-line method or a browser extension covered later in this guide.
People route Edge through a proxy to test how a site renders for a user in another market, to check localized prices and search results, to verify publicly served ads, to keep research browsing on a separate IP, and to add a layer of privacy between the browser and the sites it visits.
Gather four things before you open any settings panel. Having them ready turns a fiddly setup into a two-minute job.
One rule throughout: keep your username and password in their own fields. Do not paste them into a shared address bar or a screenshot you might share.
On Windows, the fastest route is the manual proxy panel. You can open it straight from Edge, which keeps you from hunting through the Settings app.
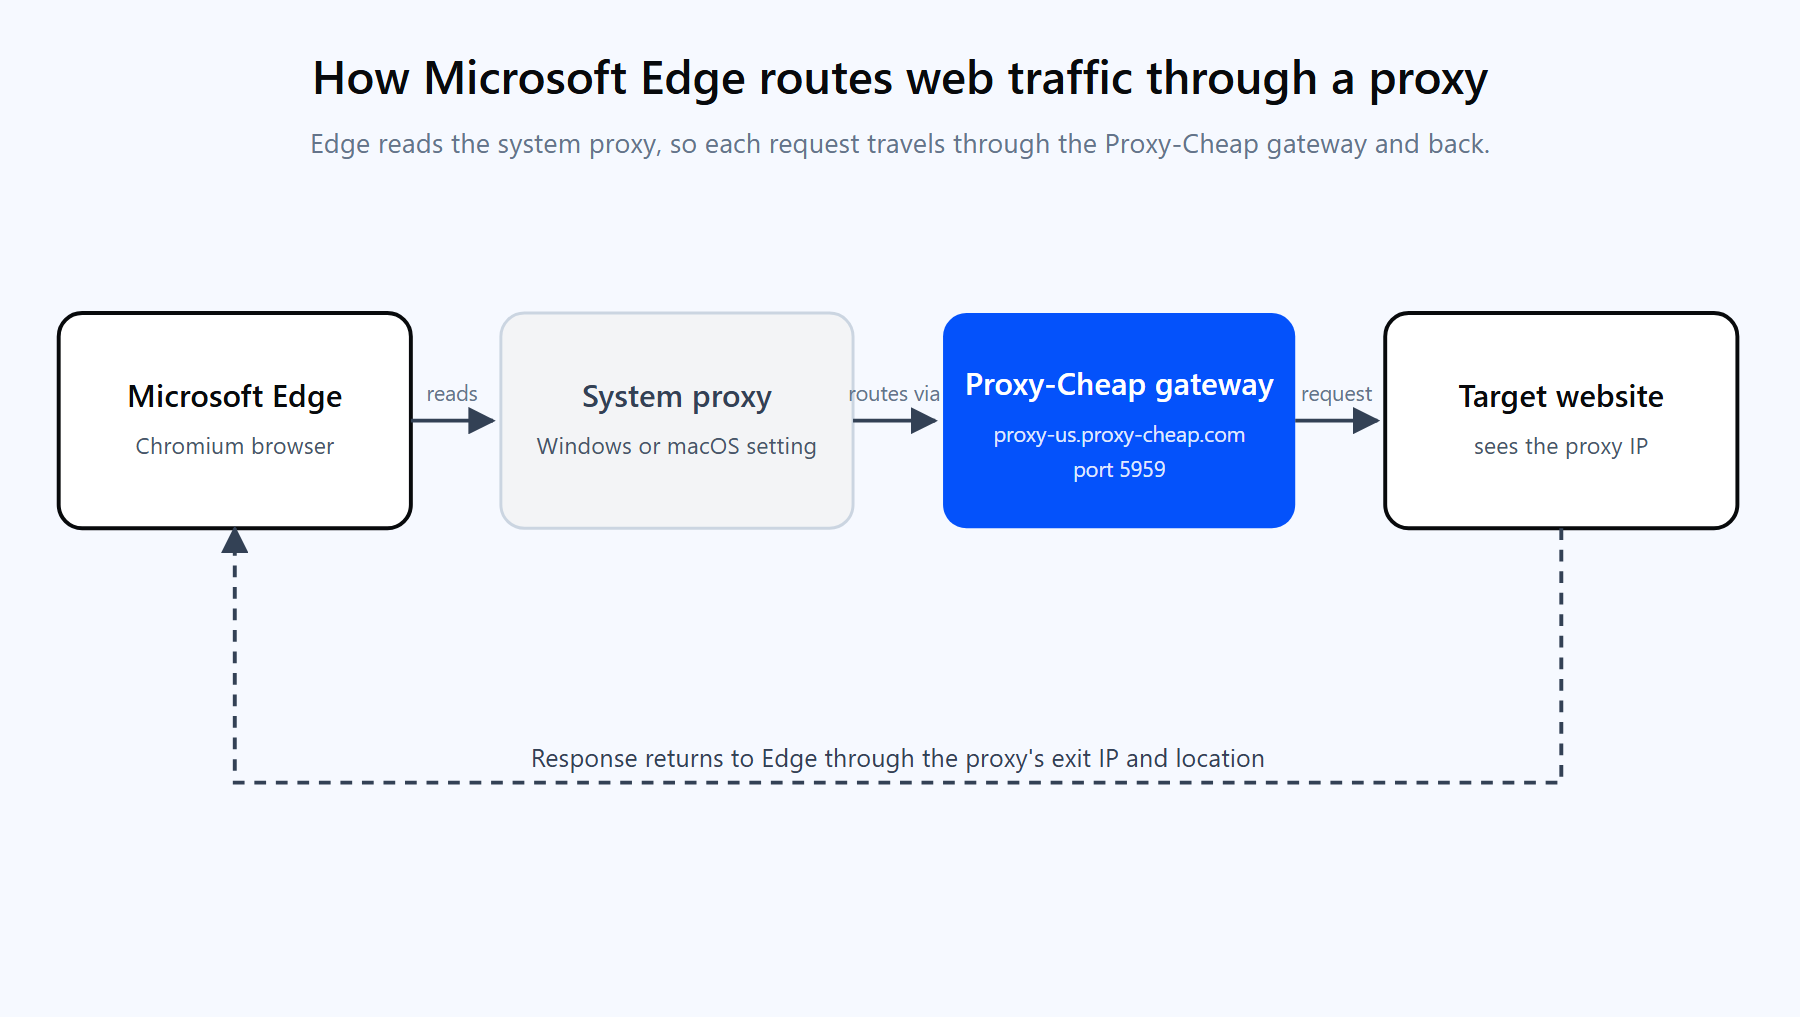
Edge reads the Windows system proxy, so each request routes through the Proxy-Cheap gateway to the target site and returns through a different exit IP.
You can reach the same page without going through Edge: press Windows + I, then go to Network & internet and select Proxy.
After you save, open a new Edge tab and visit ipinfo.io/json. If the IP and country match the proxy you entered, Edge is routing correctly. If a login prompt appears first, that is the proxy asking for your username and password, which the authentication section below explains.
Many networks hand out proxy details through a configuration file rather than a fixed address. A PAC file (proxy auto-config) is a small script that tells the browser which proxy to use for each request, which is handy when the right proxy depends on the destination.
Edge supports two automatic options on the same Windows Proxy page:
Use a PAC file when an administrator gives you one, or when you want different sites to take different routes from a single rule set. If both a setup script and a manual proxy are configured, the script usually takes priority, so pick one method to avoid confusion.
The manual and PAC methods change the system proxy, which every app inherits. To scope a proxy to a single Edge session and leave the rest of your system on a direct connection, launch Edge with command-line flags. These flags come straight from Microsoft's Edge documentation and override the system settings for that session only.
The core flag is --proxy-server. It accepts three forms:
:: 1) One proxy for all traffic msedge.exe --proxy-server="proxy-us.proxy-cheap.com:5959"
:: 2) A different proxy per scheme msedge.exe --proxy-server="http=proxy-us.proxy-cheap.com:5959;https=proxy-us.proxy-cheap.com:5959"
:: 3) A direct connection, no proxy at all msedge.exe --proxy-server="direct://" |
To point a session at a PAC file instead, use --proxy-pac-url:
| msedge.exe --proxy-pac-url="https://example.com/proxy.pac" |
To send most traffic through the proxy but let some hosts connect directly, pair --proxy-server with --proxy-bypass-list. The list is semicolon-separated and accepts trailing-domain and IP patterns:
| msedge.exe --proxy-server="proxy-us.proxy-cheap.com:5959" --proxy-bypass-list="*.example.com;127.0.0.1;localhost" |
To launch Edge with no proxy even when the system has one set, use --no-proxy-server. It overrides any other proxy option:
| msedge.exe --no-proxy-server |
On Windows you can run these from a shortcut (paste the flag after the quoted path in the shortcut's Target field) or from PowerShell:
# Close all Edge windows first, then launch a fresh session with the proxy. Start-Process "msedge.exe" -ArgumentList '--proxy-server="proxy-us.proxy-cheap.com:5959"' |
One gotcha trips people up here: Edge reuses an already-running process, so a new flag is ignored if an Edge window is already open. Close Edge completely before launching with a flag, or add --user-data-dir="C:\edge-proxy-profile" to start an isolated session that does not collide with your main browser. The command-line route also has no field for a username and password, so a protected proxy still shows the login prompt on the first request.
On a Mac, Edge reads the macOS network settings, so you configure the proxy at the system level:
The command-line flags from the previous section work on macOS too. Launch Edge from the Terminal with the same --proxy-server flag, pointing at the Edge binary inside the application bundle, when you want a session-only proxy without touching the system settings.
Because Edge is built on Chromium, it runs extensions from the Microsoft Edge Add-ons store and from the Chrome Web Store. A proxy extension is often the most convenient option: it applies to Edge only, stores your username and password so you skip the repeated login prompt, and lets you switch between proxies in a couple of clicks without reopening any settings panel.
The Proxy-Cheap browser extension installs in Edge the same way it does in Chrome. It handles HTTP and SOCKS5 imports, central proxy management, quick profile switching, and WebRTC protection so the browser does not reveal a local IP outside the proxy. For users who want a proxy in Edge but not across the whole machine, an extension is usually simpler than juggling command-line flags.
One caveat: an extension only proxies the browser it runs in, so other apps keep using the direct connection or system proxy. That is the point if you want isolation, and a limitation if you expected machine-wide coverage.
The Windows manual proxy panel has fields for the host and port, but none for credentials. When a proxy needs a login, Edge handles it with a prompt rather than a settings field. The first time you load a page through the proxy, Edge shows a sign-in box asking for your username and password. Enter them, and Edge remembers them for the rest of the session.
That prompt corresponds to the 407 Proxy Authentication Required response. If you keep seeing it, one of three things is usually true:
For credentials you do not want to retype, two routes avoid the prompt. IP allowlist authentication ties the proxy to a known IP on static residential, ISP, datacenter, and mobile products, so no login is needed from that machine. A browser extension stores the username and password in the profile and sends them automatically. On protocol choice, the Windows manual panel and most extensions assume an HTTP proxy. For SOCKS5, configure it through a PAC file, the command line (--proxy-server="socks5://host:port"), or the macOS SOCKS Proxy field.
Turning a proxy off is the same path as turning it on. Open Settings > System and performance > Open your computer's proxy settings in Edge, or Network & internet > Proxy in Windows Settings, then toggle Use a proxy server off and click Save. Switch off Use setup script and Automatically detect settings as well if either is on. Restart Edge.
To clear the system proxy from the command line, two commands cover it. The first shows what is currently set; the second resets the WinHTTP proxy to a direct connection:
netsh winhttp show proxy netsh winhttp reset proxy |
A frequent complaint is that Edge keeps changing the proxy back, often flipping from automatic to manual after a restart, or re-adding a server you removed. That behavior almost always comes from outside Edge: a group policy (the ProxySettings policy), a VPN or security app that rewrites the system proxy, or leftover malware-style settings. Check for a managed policy first, disable any app that manages connections, and run netsh winhttp reset proxy to clear a stuck value. Since the setting is system-wide, the fix lives in Windows, not in the browser.
When Edge will not connect through a proxy, the error usually points straight at the cause. Work down this list from the top:
The pattern across all of these: read the error first, confirm the host and port, then verify the exit IP. Those three checks locate almost every Edge proxy problem in under a minute.
Every method above is the same regardless of which proxy you plug in, but the result you should expect depends on the proxy type. Match the product to what you are doing in Edge:
| What you do in Edge | Best fit | Why |
|---|---|---|
| Location-accurate research and localized pricing | Rotating residential | New IP per request from real consumer connections across many regions |
| Signed-in sessions and account-bound work | Static residential (ISP) | The same trusted IP held for the whole session |
| Long-lived sessions with flexible login | ISP proxies | Static or rotating, username and password or IP allowlist |
| Fast access to public, unprotected pages | Datacenter | High throughput and predictable per-IP cost |
| Mobile-first platforms and apps | Mobile | Real carrier IPs for mobile-network tasks |
| Heavy, sustained browsing | Unlimited bandwidth | Unmetered transfer across many locations |
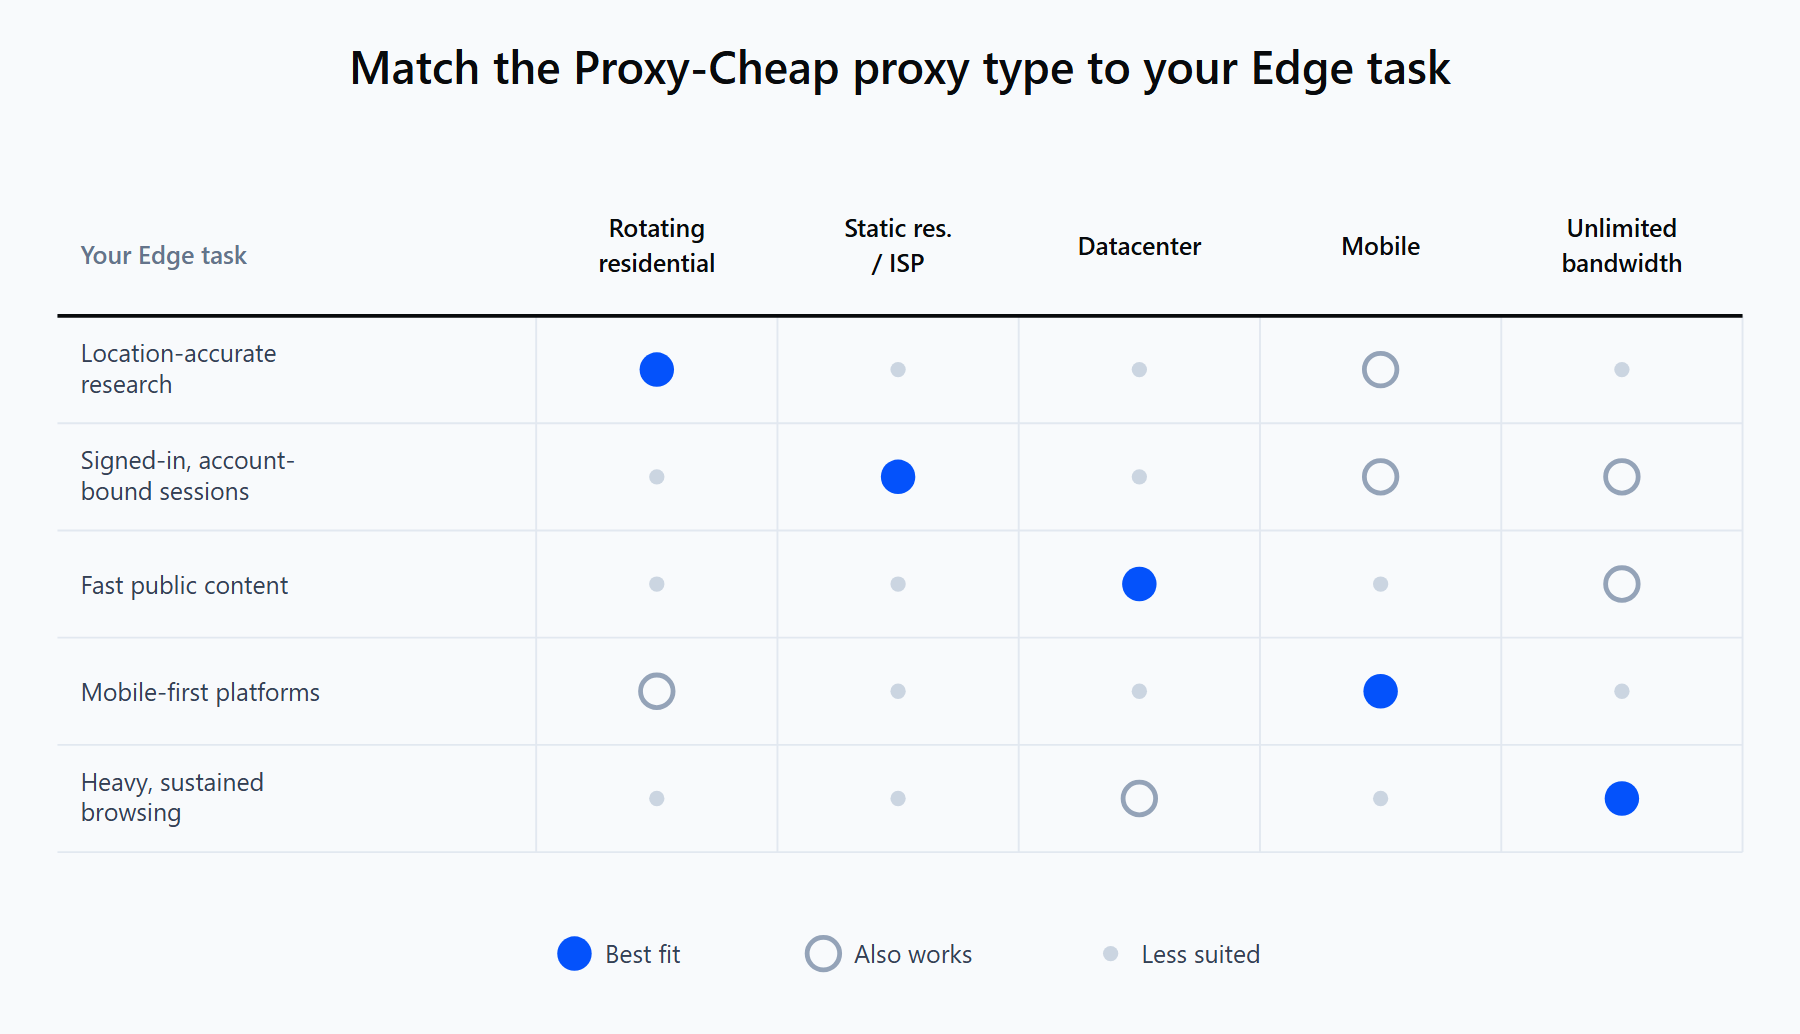
Pick the proxy type by the job in Edge: rotating residential for location-accurate research, static residential or ISP for signed-in sessions, datacenter for speed on public pages.
A quick way to choose: if a site changes its content by visitor or location, use a rotating residential or mobile IP so Edge sees what a local user sees. If you need the same IP to persist across a signed-in session, use a static residential or ISP proxy. If the target is public and you care most about speed, a datacenter IP is the efficient pick, and for heavy daily browsing an unlimited bandwidth plan keeps the meter from running.
Proxy-Cheap covers all of these on pay-as-you-go and per-IP plans, with no setup costs and cancel anytime. Generate your credentials in the dashboard, enter the host and port in Edge using the method that fits your platform, and verify the exit IP before you rely on it for real work.