BitBrowser (also written Bit Browser) is a multi-account fingerprint browser built on Chromium, with a Firefox-based core available too. It is developed by HongKong Bit-Internet Technology Limited and distributed at bitbrowser.net.
Each profile in BitBrowser, which the app calls a browser window, runs as a fully isolated environment. It carries its own device fingerprint (user agent, WebGL, Canvas, Audio, fonts, timezone, WebRTC, resolution, geolocation, and DNS), its own cookies and local storage, and its own proxy IP. Because those signals do not overlap between profiles, you can operate many accounts side by side on one computer while keeping each one internally consistent and separate from the others.
That model puts BitBrowser in the same category as the tools covered in our roundup of the best antidetect browsers for multi-accounting. The proxy is the piece that completes the picture: the fingerprint separates the browser environments, and a dedicated IP per profile separates the network identity.
BitBrowser is used anywhere one operator needs to run several accounts that each look like a distinct, ordinary user. The most common jobs:
The unifying thread is legitimate multi-account management: many accounts, each kept in good standing under its own consistent fingerprint and IP.
The features that matter most for proxy-backed multi-account work:
Yes. BitBrowser has a permanent free plan, not a time-limited trial. The free tier includes 10 browser profiles and 1 member seat, with a cap of 50 profile opens per day. You only need to register and verify an email address.
Paid plans scale the profile and seat counts. At the time of writing the tiers are roughly:
| Plan | Profiles | Seats | Approx. price |
|---|---|---|---|
| Free | 10 | 1 | Free (50 opens/day) |
| 50 Profiles | 50 | 2 | ~$10/month |
| 100 Profiles | 100 | 4 | ~$15/month |
| 200 Profiles | 200 | 8 | ~$25/month |
| Custom | Up to 300,000+ | Custom | Contact sales |
BitBrowser also lists quarterly, semi-annual, and annual discounts of roughly 10 to 30 percent. Prices change often, so confirm the current figures on the BitBrowser pricing page before you commit. One thing the plans do not include is proxies: BitBrowser is bring-your-own-proxy, which is where a provider like Proxy-Cheap fits in.
BitBrowser runs on Windows 10 or later (64-bit) and macOS 12 Monterey or later, with separate builds for Apple Silicon and Intel Macs. There is no native Linux desktop build. On Windows, the app suggests a 4-core CPU, 8 GB of RAM, and at least 50 GB of free disk space.
Installation is quick:
Before you add a proxy, create a profile to attach it to. This takes under a minute.
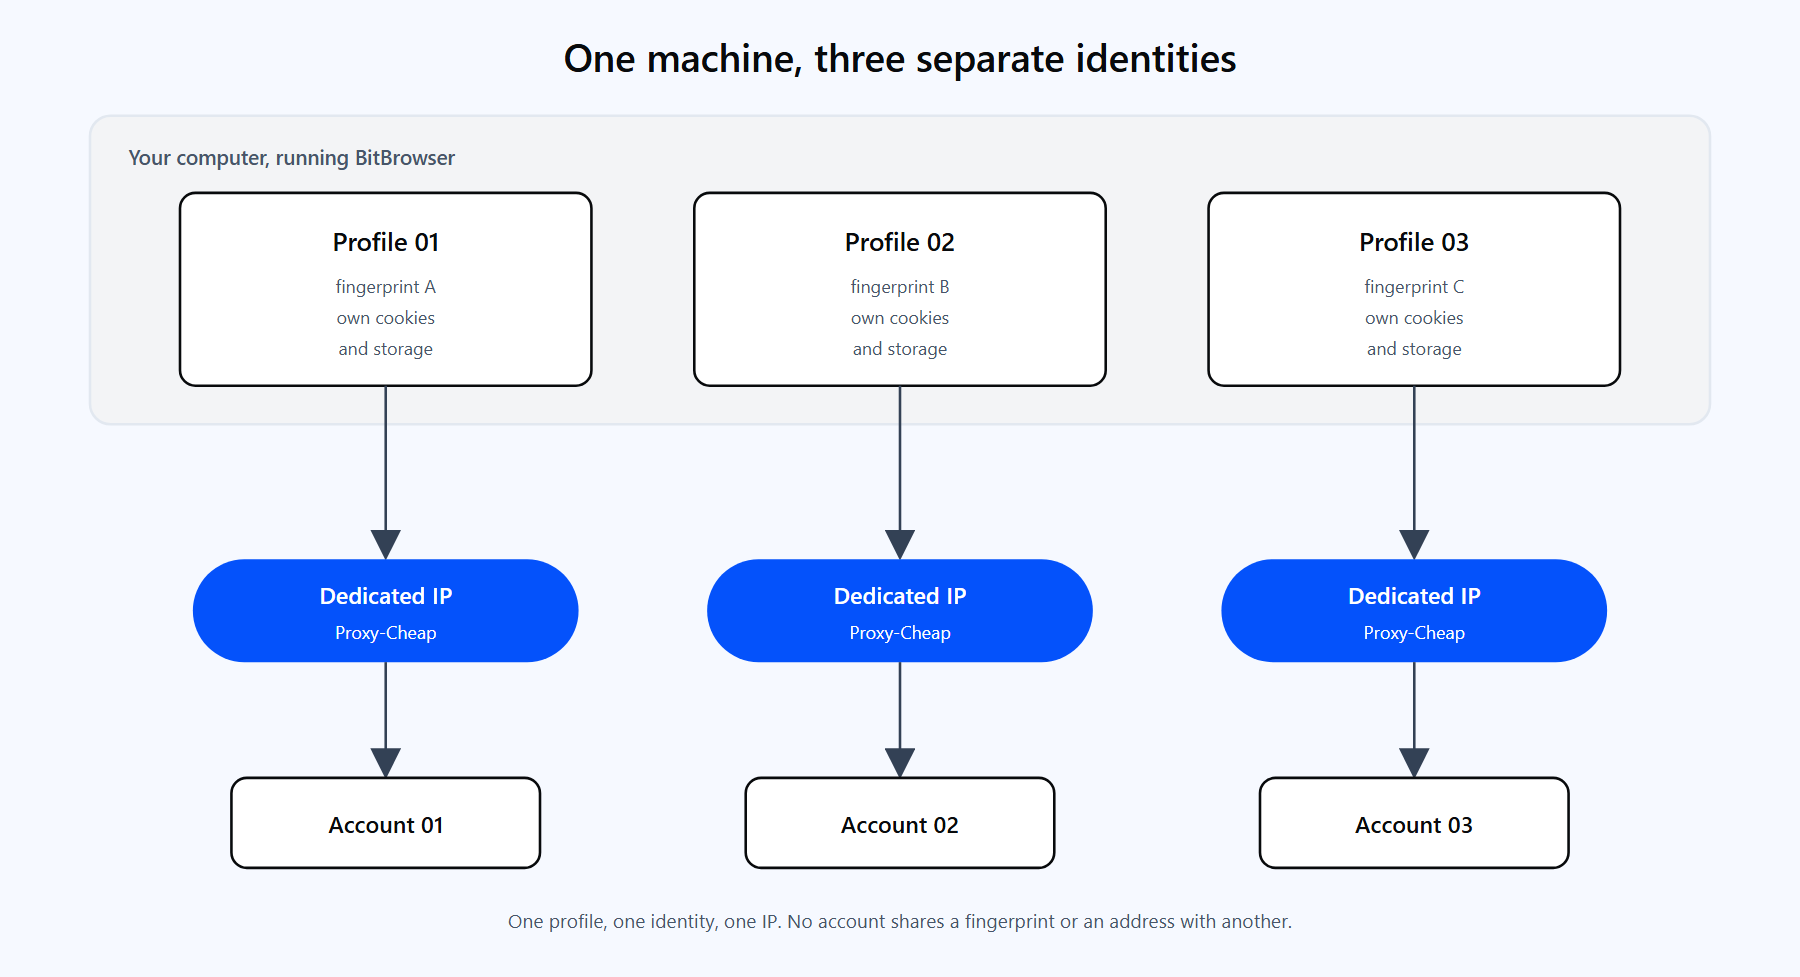
Each BitBrowser profile is a separate environment with its own fingerprint and its own dedicated IP. One profile, one identity, one proxy.
At this point the profile uses your real connection. The next sections add a proxy so each profile has its own IP, which is the part that actually separates the accounts at the network level.
BitBrowser separates your accounts at the browser level, but every profile still leaves through the same connection until you add a proxy. Two profiles sharing one public IP are easy to associate, no matter how distinct their fingerprints are. Routing each profile through its own IP from a residential proxy network is what makes multi-account management hold up in practice.
Three concrete reasons to put a proxy on every BitBrowser profile:
Not every profile needs the same kind of proxy. The table below maps Proxy-Cheap product lines to the jobs people actually run in BitBrowser.
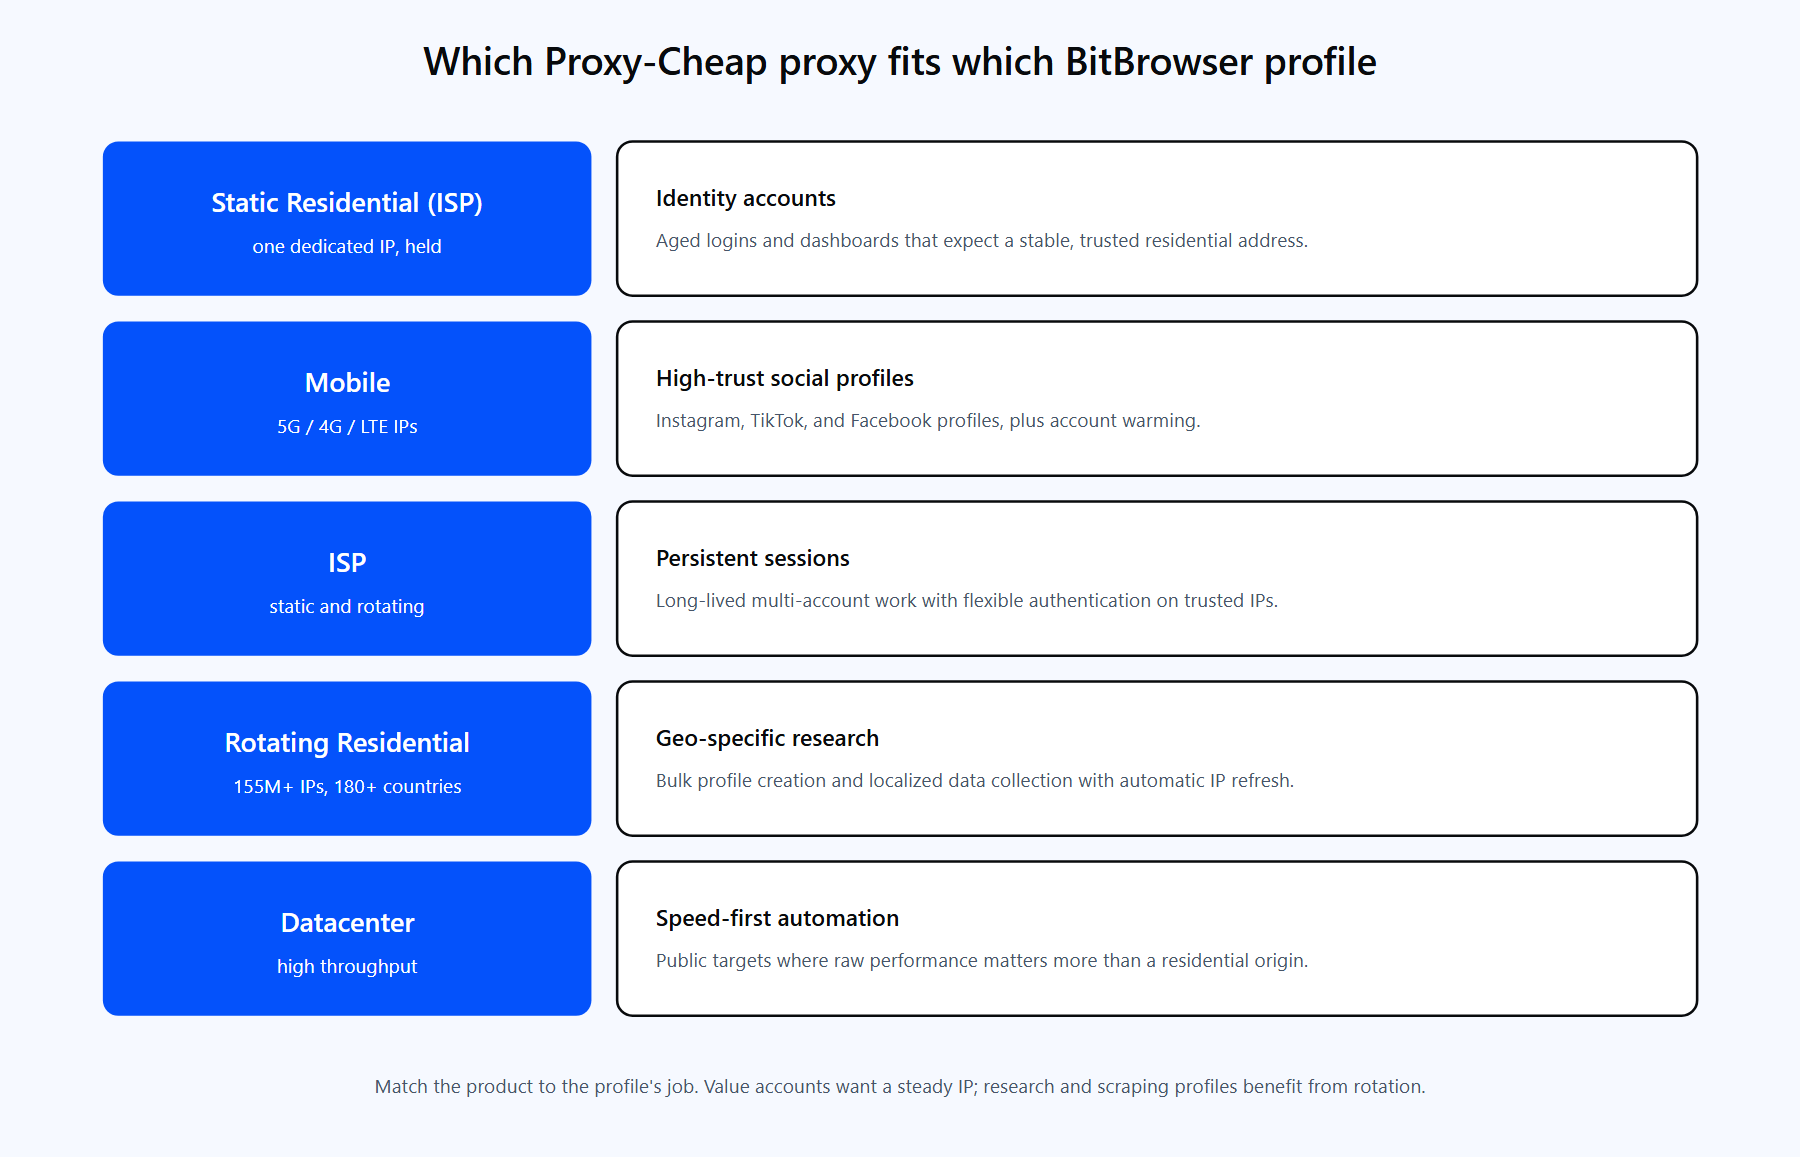
Each product line fits a different profile type. The links below match the cards above.
For most BitBrowser operators the answer is Static Residential (ISP) or Mobile for the accounts that carry value, and Rotating Residential or Datacenter for research and automation profiles.
Proxies live inside each profile, so you set them when you create or edit a browser window. Here is the full path using the Custom method, which is the manual entry option.
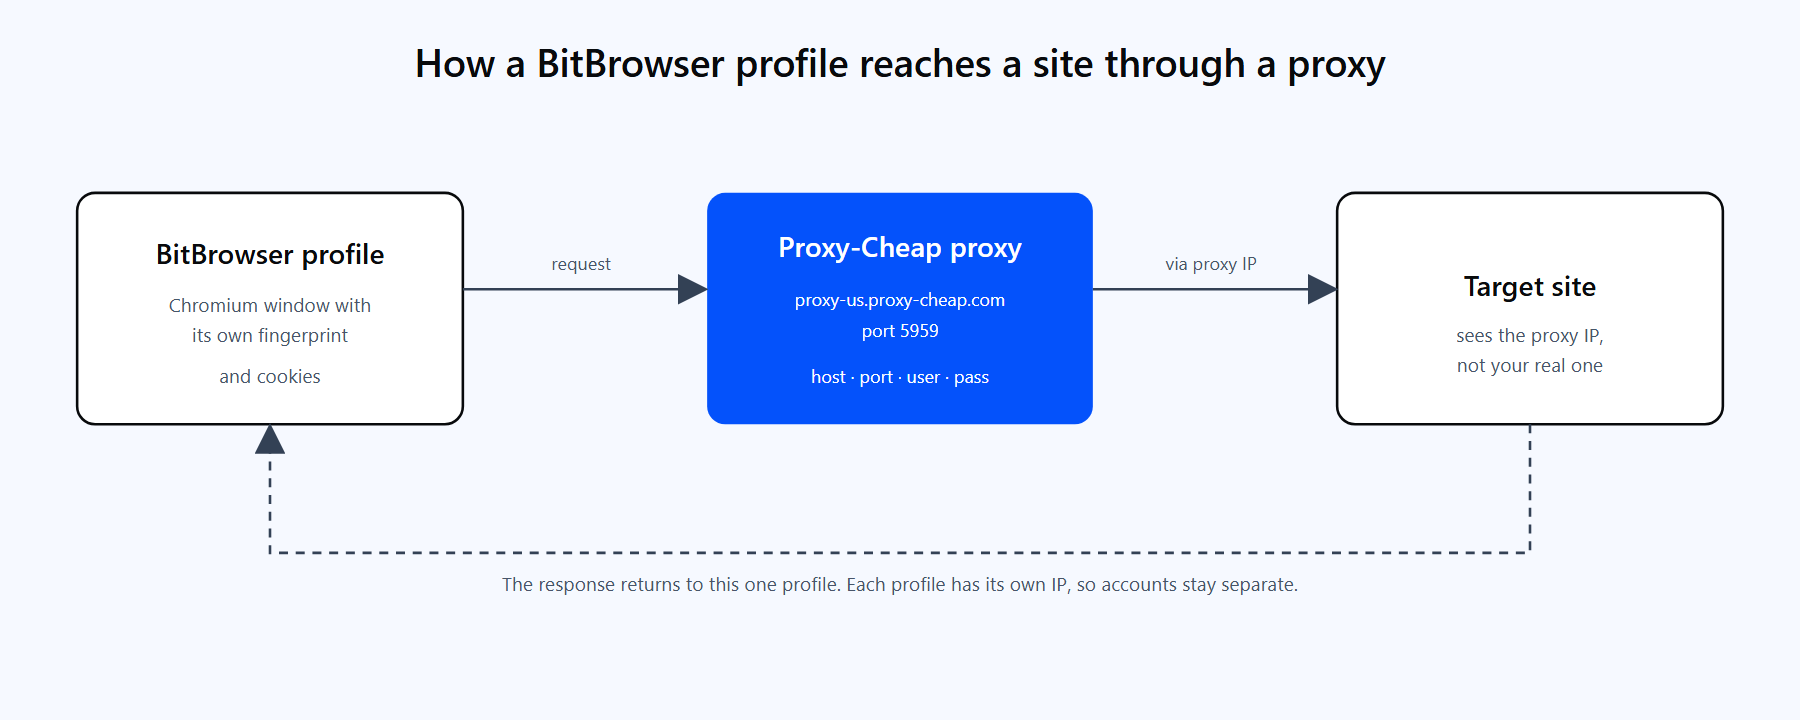
A BitBrowser profile sends its traffic through the Proxy-Cheap proxy, reaches the target site from the proxy's IP, and returns the response to that single profile.
Rotating residential now uses one shared hub, host thehub.proxy-cheap.com and port 8080, with your username and password. You choose the country, the session, and the session lifetime in the dashboard credential generator. Static products (residential/ISP, datacenter, and static mobile) assign a unique host and port to each proxy, which you copy from the dashboard. If you are new to the panel, the Proxy-Cheap dashboard guide walks through where those credentials appear.
IP whitelist as an alternative to username and password. Static Residential (ISP), datacenter, and static mobile products support IP allowlist authentication. If you prefer not to store credentials in the profile, add your current public IP to the allowlist in the Proxy-Cheap dashboard and leave the username and password fields blank in BitBrowser. Re-add your IP whenever your own ISP address changes. Note that IP whitelist is not offered on rotating residential, which uses username and password.
Rotation works one of two ways in BitBrowser, and the right choice depends on whether the profile needs a steady IP or a fresh one each time.
BitBrowser also offers an Extract By API input method. Instead of typing a single proxy, you paste your provider's proxy-extraction URL, and BitBrowser pulls a fresh IP from it when the profile launches. This is handy for large pools where the provider hands out IPs through a link rather than a fixed host and port.
For a full breakdown of when each type fits, see static vs rotating proxies. The short version for multi-accounting: identity accounts want one steady IP, while research and scraping profiles benefit from rotation.
To assign proxies across many profiles at once, use the Proxy Management tab or the batch tools. You can import a list of proxies (one per line, or as host:port:username:password), tag them, and map one proxy to each profile so no two accounts share an address.
BitBrowser ships a local REST API for driving profiles from your own code. It listens on http://127.0.0.1:54345 by default (you can confirm the port under Settings), takes HTTP POST requests with JSON bodies, and requires no API key because it is bound to localhost. The BitBrowser app must be running and signed in.
The key detail for automation: you configure the proxy on the profile (in the GUI or through the API), then open the profile and attach your automation tool to the already-running browser. The automation code itself carries no proxy details, because the profile already has the IP bound to it.
Open a profile and read back its debugging endpoint:
# The profile id comes from the profile list in the app or from /browser/list.
curl -X POST http://127.0.0.1:54345/browser/open \
  -H "Content-Type: application/json" \
-d '{"id": "<your-profile-id>"}'A successful call returns a JSON body whose data field includes ws (a WebSocket endpoint for Puppeteer or Playwright), http (the debugger address for Selenium), and driver (a path to a matching chromedriver). Attach Selenium to the running window like this:
import requests
from selenium import webdriver
from selenium.webdriver.chrome.service import Service
from selenium.webdriver.chrome.options import Options

API = "http://127.0.0.1:54345"

# 1. Open the profile. BitBrowser launches it with the proxy already
#    bound to the profile, so no proxy details go in this code.
res = requests.post(f"{API}/browser/open", json={"id": "<your-profile-id>"}).json()
data = res["data"]

# 2. Attach Selenium to the running Chromium via its debugger address.
options = Options()
options.add_experimental_option("debuggerAddress", data["http"])
driver = webdriver.Chrome(service=Service(data["driver"]), options=options)

driver.get("https://httpbin.org/ip")   # echoes the outbound IP
print(driver.page_source)
driver.quit()You can also create or update a profile and set its proxy entirely through the API, which is useful when provisioning many profiles at once. Sending a body without an id creates a new profile; including an id updates that profile.
import requests

API = "http://127.0.0.1:54345"

# Create a profile with a Proxy-Cheap rotating residential proxy bound to it.
payload = {
    "name": "profile-01",
    "proxyMethod": 2,               # 2 means enter the proxy details manually
    "proxyType": "http",            # http for the rotating residential gateway
    "host": "thehub.proxy-cheap.com",
    "port": "8080",
    "proxyUserName": "<your-proxycheap-username>",
    "proxyPassword": "<your-proxycheap-password>",
    "browserFingerPrint": {"coreVersion": "112"},
}

res = requests.post(f"{API}/browser/update", json=payload).json()
print(res["success"], res.get("data", {}).get("id"))For Puppeteer, connect with puppeteer.connect({ browserWSEndpoint: data.ws }). For Playwright, use chromium.connectOverCDP(data.ws). In every case the traffic leaves through the proxy you set on the profile. The full field list for /browser/update is in BitBrowser's API documentation; the fields above are the ones that matter for the proxy.
Most proxy problems in BitBrowser fall into a handful of buckets. Each has a clear fix.
1. Check Proxy fails or cannot connect. BitBrowser's test only confirms whether the tunnel opens, so a failure usually means a typo or an upstream issue. Re-check the host, port, username, and password for stray spaces, then click the fingerprint icon and run Proxy Detection again. If it still fails, the proxy itself is the problem: request a fresh IP or confirm your plan still has bandwidth with your provider. Testing the same proxy in a simple client first tells you whether BitBrowser or the proxy is at fault.
2. Wrong proxy type selected. If the Proxy Type dropdown does not match the endpoint (for example SOCKS5 chosen for an HTTP-only gateway), the proxy never connects. Match the dropdown to the provider's spec and use the port that belongs to that protocol, since HTTP and SOCKS5 usually use different ports. Re-run Check Proxy after each change until the IP and location populate.
3. Authentication fails (whitelist vs username and password). Two auth models get mixed up. With username and password, a padded or wrong credential is rejected: re-paste it with no leading or trailing spaces. With IP whitelist, the provider expects no credentials and instead needs your current public IP on its allowlist: clear the username and password fields in BitBrowser and add your IP in the dashboard, re-adding it whenever your ISP address changes.
4. The same IP shows on several profiles. This happens when profiles were created without a distinct proxy each, so they fall back to your real connection. Assign a unique IP to every profile, never fewer IPs than accounts, and verify each window independently on an IP-check site to confirm a different exit IP per profile.
5. Timezone, WebRTC, or geolocation do not match the proxy. If the proxy exits in one country but the profile reports another timezone or WebRTC IP, the signals look inconsistent. Leave the profile timezone on auto so it derives from the proxy IP, set language to the IP's region, and set WebRTC to Replace so it reports the proxy IP. Confirm on an IP and WebRTC leak checker that every signal matches the proxy country.
6. Check passes but pages will not load. The tunnel connects but requests stall, usually a local network or routing mismatch rather than a credential issue. Following BitBrowser's own guidance, switch to a proxy in a different network environment (for example an overseas exit if your local network limits the current one) and retest. If the network is not the constraint, contact support, since the credentials already validated.
7. A Local API window opens on your real IP. In the API, proxyType defaults to noproxy. If the create or update body omits the proxy fields or leaves the type as noproxy, the window opens on a direct connection. Set proxyType to http, https, or socks5 in the JSON body and include host, port, proxyUserName, and proxyPassword, then open the profile and confirm the exit IP before running automation.
8. A rotating IP changes mid-session and logs the account out. A per-request rotating endpoint hands out a new IP on every connection, and mid-session changes trigger re-verification or forced logouts. Use a sticky or session endpoint so one profile keeps one IP for the session, and only pull a new IP deliberately between sessions, not during one.
For legitimate multi-account management, BitBrowser is one of the stronger options in its class. The free plan is genuinely useful, the fingerprint isolation is thorough, and the Local API makes it easy to automate. A few tradeoffs are worth weighing.
Pros
Cons
The practical setup for most teams: run BitBrowser for the fingerprint isolation, pair it with a value-tier provider on pay-as-you-go pricing, and assign one dedicated IP per profile. That covers the vast majority of multi-account workflows without enterprise overhead.