What is Zapier?
Zapier is a no-code automation platform that connects the apps you already use and moves data between them on autopilot. You build a workflow called a Zap, pick a trigger event in one app, and add one or more actions that run automatically when the trigger fires. No servers to manage and no code required for the common cases.
At the time of writing, Zapier connects more than 9,000 apps, from Gmail and Slack to Airtable, HubSpot, and Google Sheets. It runs entirely in the cloud on Amazon Web Services, which is the single most important fact for this guide. Because your Zaps execute on Zapier's infrastructure rather than your own machine, you cannot point them at a system-level proxy. Any proxying has to happen inside the request itself, and that is exactly what a Code by Zapier step lets you do.
What is Zapier used for?
Most teams reach for Zapier to remove repetitive manual steps between tools. The typical jobs:
That last case is why developers search for a proxy integration with Zapier: they want an automation that pulls publicly available data or hits a geo-specific API from the right network.
Key features of Zapier
The pieces that matter when you plan a proxied workflow:
Is Zapier free to use?
Zapier has a free tier and several paid plans: Free, Professional, Team, and Enterprise. The free plan covers basic Zaps (a trigger plus one action) and a capped number of monthly tasks, which is enough to test an idea.
For proxy work, the plan you choose has real consequences, and they come down to two limits:
Code by Zapier exists on every tier, so you can prototype a proxied request on Free, then move to Professional once real requests need more than a second to complete.
How to set up a Zap with a Code by Zapier step
Before any proxy, get a plain Code step running. The flow is the same every time.
Two rules of the Code by Zapier contract are worth memorizing. You read inputs from the input_data dictionary, and you return results by assigning a variable named output (a dict or a list of dicts). Anything you put in output becomes available to later steps in the Zap.
Quickstart: your first Code by Zapier request
Here is the smallest useful example: fetch a URL and return its status and a slice of the body. Map one Input Data field named target_url first.
# Code by Zapier (Python 3.7.2).
# requests, BeautifulSoup, and StoreClient are already available,
# so there is no import line to add.
url = input_data["target_url"]
response = requests.get(url, timeout=25)
output = {
"status_code": response.status_code,
"body": response.text[:500],
}
Note the timeout=25. The Code step is capped at 30 seconds on Professional and Team plans, so keeping the request timeout just under the ceiling means a slow target fails cleanly inside your code instead of tripping the sandbox timeout. Keep one network request per step for the same reason.
This works, but every request leaves from Zapier's shared cloud IP. To control the exit network, you add a proxy, and for that you need to know which Zapier tool can carry one.
Code by Zapier vs Webhooks by Zapier
New users reach for Webhooks by Zapier first, because sending an HTTP request looks like a job for a webhook. For a proxied request, that instinct leads to a dead end.
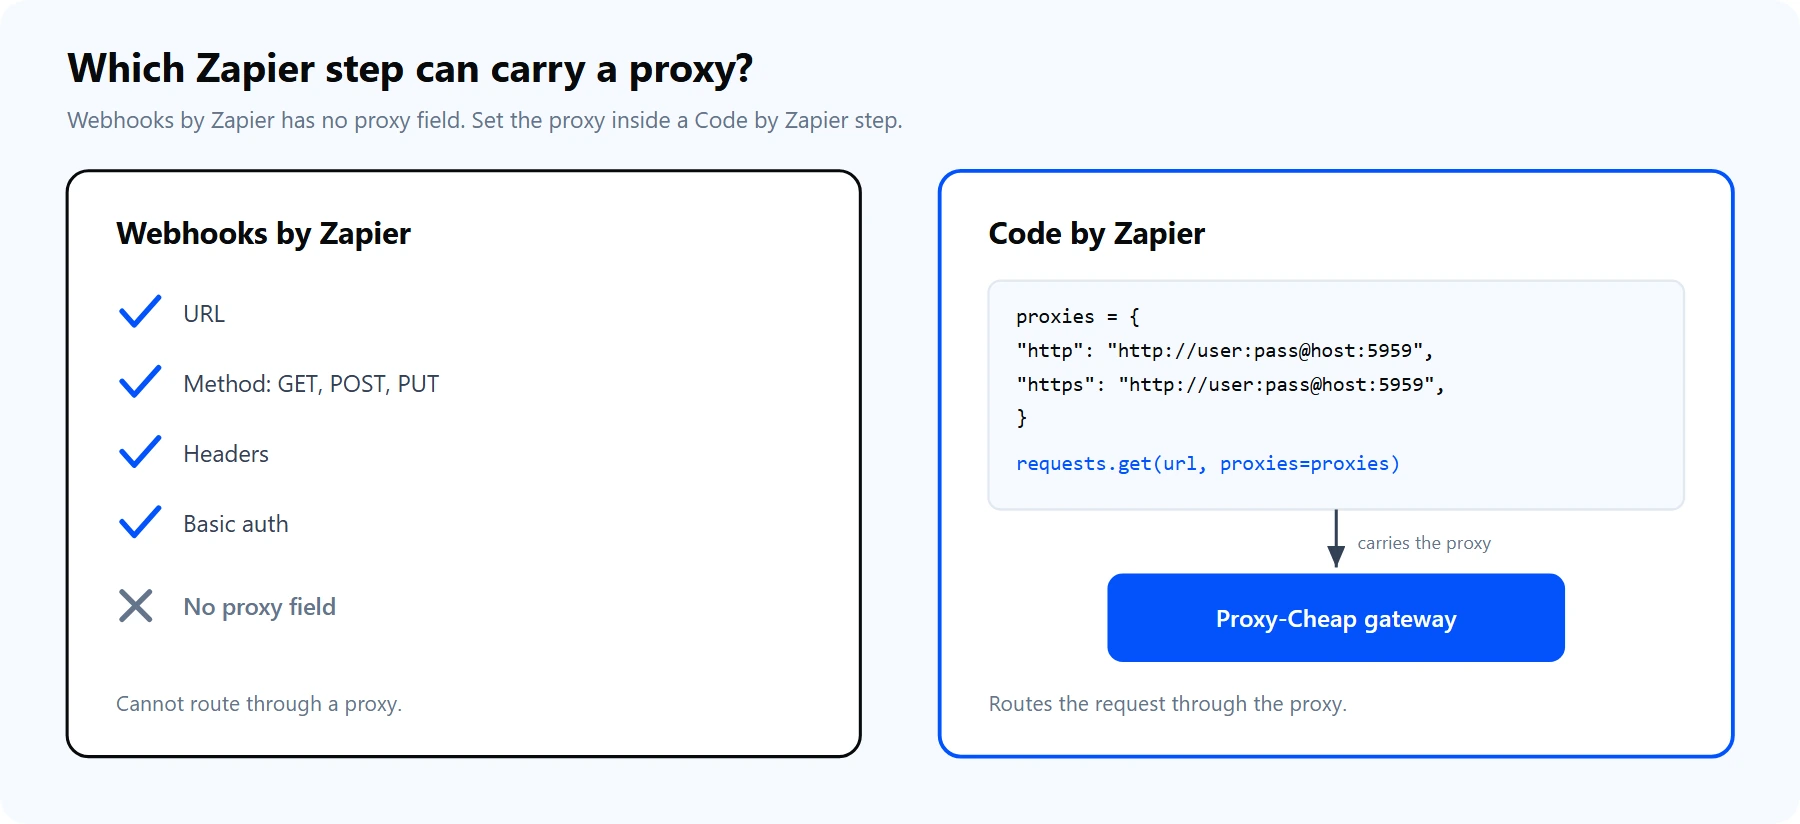
Webhooks by Zapier exposes URL, method, headers, and basic auth, but no proxy field. Code by Zapier lets you attach a proxies dict, so it is the step that carries the proxy.
Webhooks by Zapier is excellent at what it does: fire a GET, POST, PUT, or Custom Request at a URL, with query parameters, headers, and basic auth. What it does not expose is any way to route that request through a proxy. There is no proxy field, and no header you can add will change the outbound network path.
Code by Zapier is different. Because you control the actual request in Python, you control every option requests supports, including the proxies argument. That single difference is why the entire integration runs through a Code step and not a webhook. The rest of this guide lives inside Code by Zapier.
Why you need a proxy with Zapier
A Zap that fetches data runs from Zapier's shared AWS infrastructure. For a handful of low-stakes calls that is fine. It stops being fine the moment the workflow does public-web data collection at any volume, which is why data-heavy automations route through a residential proxy network. Three concrete reasons:
Proxy-Cheap offers several product lines that map onto Zapier workloads. For a wider view of what to look for in a provider, the best proxies for web scraping guide covers the selection criteria.
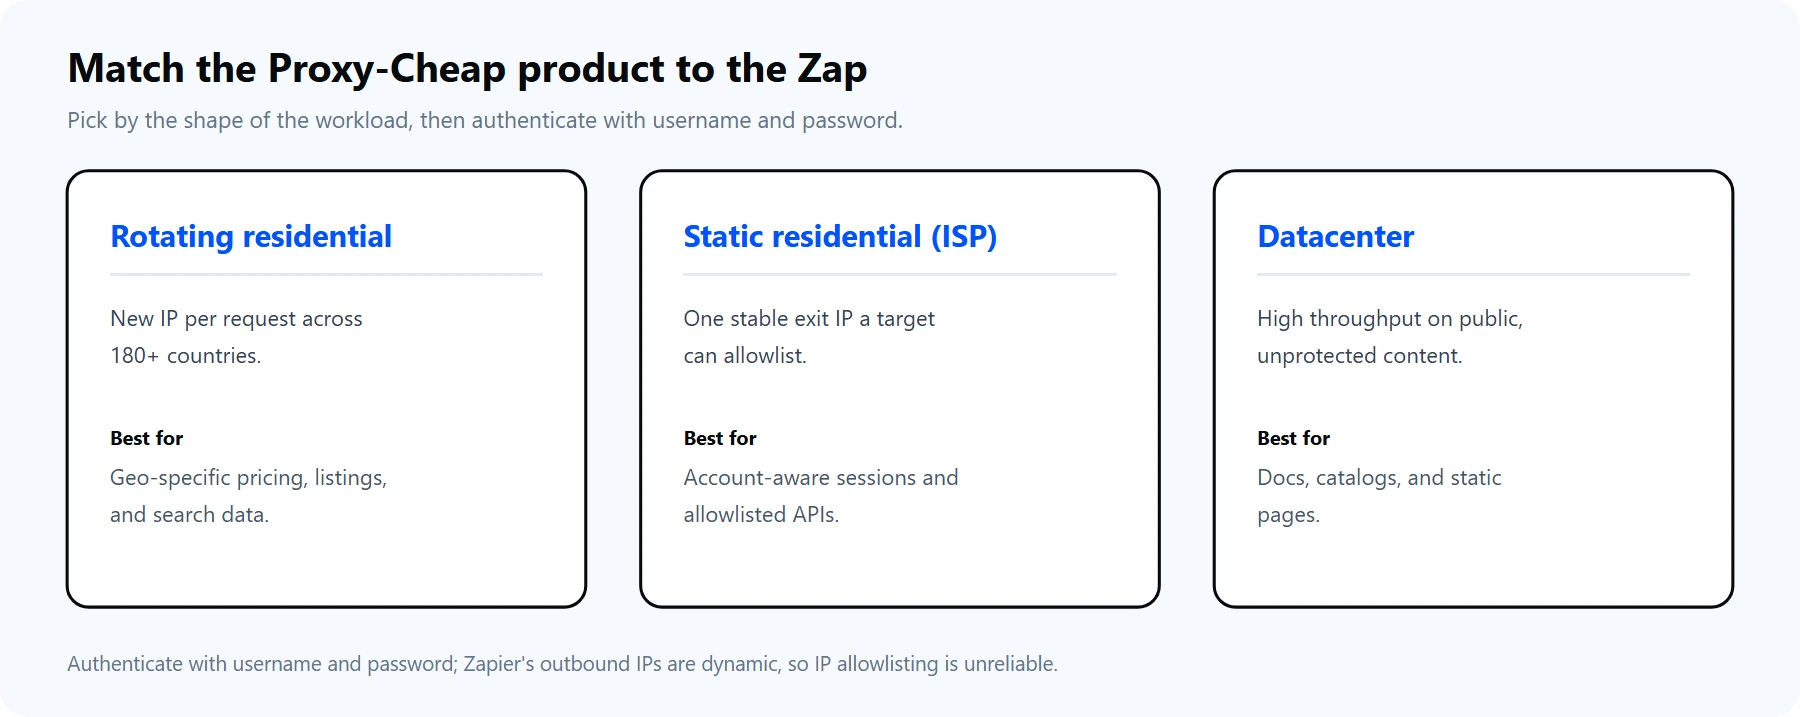
Pick the product by the shape of the workload the Zap performs, not by budget alone.
How to set up a proxy with Zapier
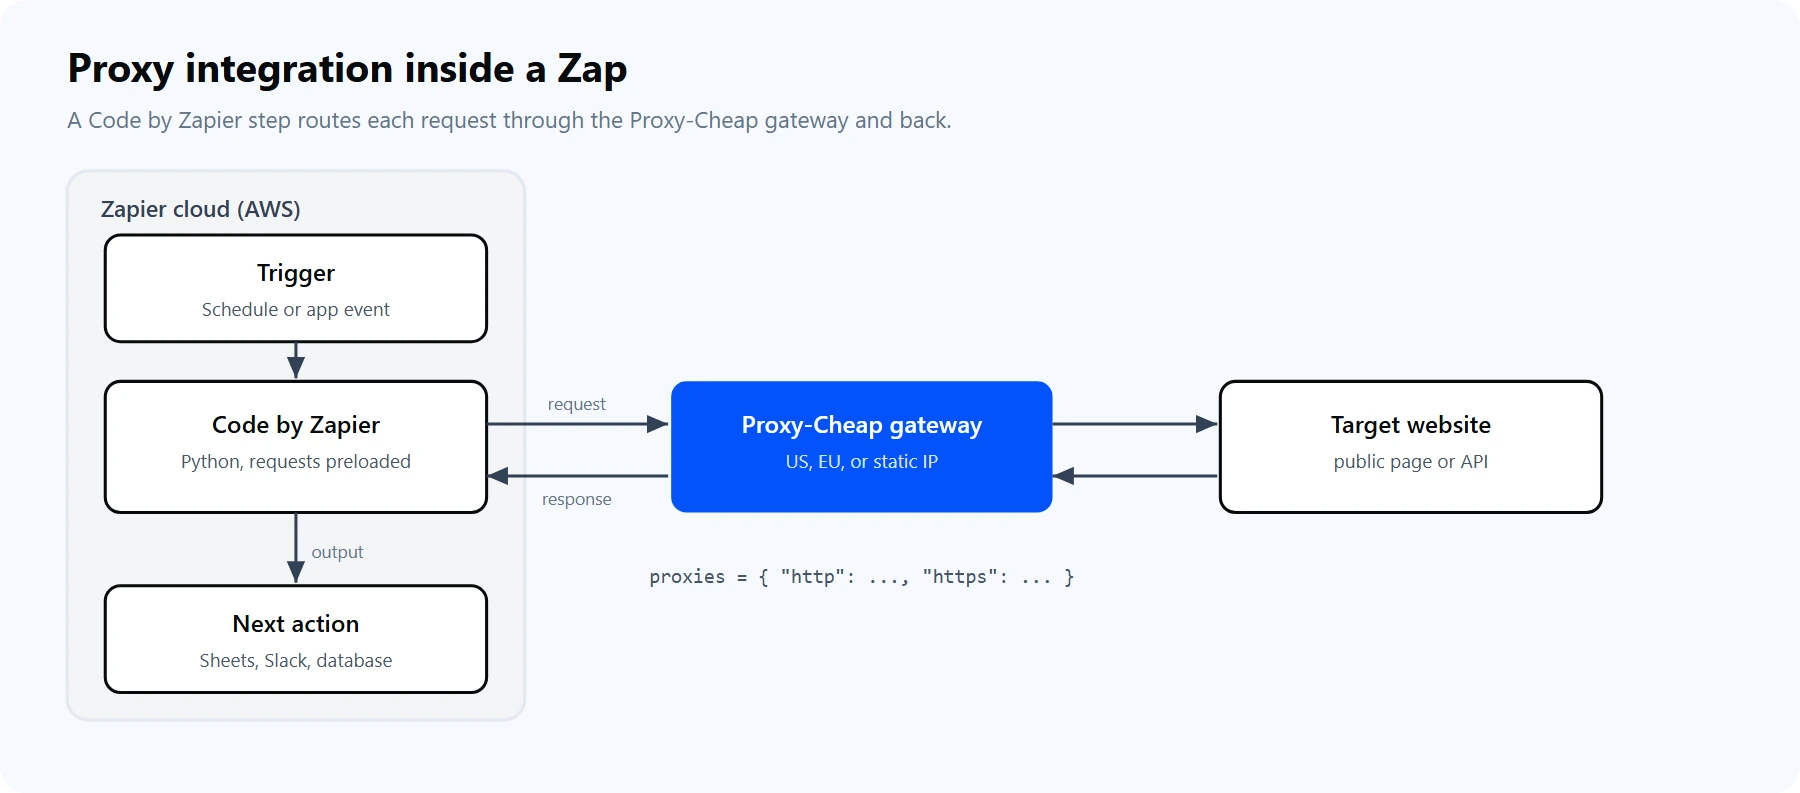
A Zap trigger fires a Code by Zapier step. The step routes the request through the Proxy-Cheap gateway, fetches the target through a proxy IP, and returns the response to the next action.
Inside a Python Code step, a proxy is one dictionary passed to requests. Before the code, a quick note on Proxy-Cheap's endpoint format, because it differs by product:
The setup. First, add three Input Data fields in the step: proxy_user, proxy_pass, and target_url. Mapping the credentials as fields keeps them out of the code itself. Then:
# Code by Zapier (Python). requests is preloaded.
# Input Data fields: proxy_user, proxy_pass, target_url
host = "thehub.proxy-cheap.com:8080" # one hub; choose the country in your dashboard credentials
proxy_url = "http://{user}:{pw}@{host}".format(
user=input_data["proxy_user"],
pw=input_data["proxy_pass"],
host=host,
)
proxies = {
"http": proxy_url, # both keys use the http scheme,
"https": proxy_url, # even when target_url is https (the scheme is the proxy hop)
}
response = requests.get(input_data["target_url"], proxies=proxies, timeout=25)
output = {
"status_code": response.status_code,
"exit_ip": response.text, # try target_url = https://httpbin.org/ip to see the exit IP
}
Test the step against https://httpbin.org/ip. If the JSON shows an IP from the proxy pool rather than an AWS address, the route is working.
A few practical notes from real usage:
Rotating proxies with Zapier
You get IP rotation in one of two ways, depending on the product.
Rotating residential: rotation is automatic. Every request through thehub.proxy-cheap.com:8080 gets a fresh exit IP from the hub. Your code needs only the single hub entry from the previous section, and each run of the Zap lands on a new IP with no extra work.
Static proxies: rotate in code. If you bought a set of static residential, ISP, or datacenter proxies, each is a fixed IP. To spread requests across them, cycle through the list. StoreClient persists a counter between Zap runs, so a round-robin survives across executions:
# Code by Zapier (Python). StoreClient persists values between runs.
# Input Data fields: proxy_user, proxy_pass, target_url
hosts = [
"thehub.proxy-cheap.com:8080",
"thehub.proxy-cheap.com:8080",
# or the unique host:port of each static proxy from your dashboard
]
store = StoreClient("<your-store-secret>")
index = int(store.get("rr_index") or 0)
host = hosts[index % len(hosts)]
store.set("rr_index", index + 1)
proxy_url = "http://{u}:{p}@{h}".format(
u=input_data["proxy_user"], p=input_data["proxy_pass"], h=host,
)
proxies = {"http": proxy_url, "https": proxy_url}
response = requests.get(input_data["target_url"], proxies=proxies, timeout=25)
output = {"used_host": host, "status_code": response.status_code}
Which line to choose comes down to the workload. Rotating residential is the default for high-volume, geo-specific collection: a large pool, a new IP per request, and stable quality across long-running Zaps. Static products are the right pick when you need the same IP to persist, for account-aware sessions or an allowlisted API. For a deeper look, read static vs rotating proxies, and for rotation patterns in raw Python, how to rotate proxies in Python with Requests and AIOHTTP.
Advanced: geo-specific data collection with proxied requests
Once the proxy is in place, a single Code step can fetch and parse in one pass. BeautifulSoup is preloaded, so you can route through a proxy in the target country and pull a specific value out of the HTML without any extra install. The example below reads a static host from Input Data so you can pin the request to one market:
# Code by Zapier (Python). requests and BeautifulSoup are preloaded.
# Input Data fields: proxy_user, proxy_pass, proxy_host, target_url
# proxy_host is a static residential host:port in the target market.
proxy_url = "http://{u}:{p}@{h}".format(
u=input_data["proxy_user"], p=input_data["proxy_pass"], h=input_data["proxy_host"],
)
proxies = {"http": proxy_url, "https": proxy_url}
response = requests.get(input_data["target_url"], proxies=proxies, timeout=25)
soup = BeautifulSoup(response.text, "html.parser")
price = soup.select_one(".price")
output = {
"price": price.get_text(strip=True) if price else None,
"http_ok": response.status_code == 200,
}
A static residential IP in the target country returns the pricing and inventory a local user would see, which is what makes geo-specific collection accurate. From there, the parsed value flows straight into the next Zap action: a Google Sheets row, a Slack alert, a database insert.
For jobs that genuinely need more than the Code step allows, longer than the plan's runtime or larger than the payload limit, move the heavy fetch off Zapier. Have the Zap call your own small endpoint (a serverless function or a tiny API) that runs the proxied request and returns compact JSON. Zapier orchestrates and stores the result; your endpoint does the work without the sandbox limits. This is the clean pattern for long crawls, big responses, or anything that needs a library beyond the preloaded set.
Common errors and how to fix them
Most proxy issues inside Zapier fall into a handful of buckets. Each has a direct fix.
1. `407 Proxy Authentication Required`. The gateway rejected your credentials. The cause is almost always a malformed proxy URL. Put the credentials in the URL userinfo (http://USER:PASS@HOST:PORT), read them from Input Data rather than pasting them inline, and URL-encode any special characters in the password. Confirm the host, port, username, and password against the dashboard.
2. The request works without a proxy but breaks with one. Check the scheme in your proxies dict. Both the http and https values must start with http://, not https://, because the scheme describes the hop to the proxy. A mismatched scheme is the most common silent failure.
3. `The app did not respond in-time` or a sandbox timeout. The Code step ran past its limit (1 second on Free, 30 seconds on Professional and Team). Set an explicit timeout=25 on the request, keep one network call per step, and upgrade to Professional if a single proxied call still needs more room. Retry a slow or dead proxy quickly rather than waiting on it.
4. An API rejects the call even though the code is correct. The target likely authenticates by IP, and Zapier's outbound AWS IP is dynamic. Route the call through a static residential or ISP proxy so the target sees one stable IP you can register, or switch to credentialed proxy auth, which does not depend on the caller's IP.
5. `SSLError: certificate verify failed`. First confirm it is a real certificate problem and not a slow-connection timeout wearing the same error text. Prefer proxies that pass TLS through transparently so the target's real certificate reaches your code. Disabling verification with verify=False is a last resort for non-sensitive endpoints only, and you should understand the tradeoff before using it.
6. `Response payload size exceeded` or `Response content is too large`. A Code step runs on AWS Lambda with roughly a 6 MB input/output limit, and webhook responses have their own caps. Slice the response before returning it (response.text[:5000]), extract only the fields you need with BeautifulSoup, and never pass a full raw HTML page into output.
Is Zapier good for proxy workflows? Pros and cons
For no-code and low-code teams, Zapier is a strong home for proxied automations, as long as you keep each request small and run it inside a Code step. A few honest tradeoffs.
Pros
Cons
The middle ground for most teams: keep Zapier as the orchestrator, do the proxied fetch in a lean Code step, and pair it with a value-tier proxy on pay-as-you-go billing. That covers the large majority of automation-driven data collection without standing up your own servers.